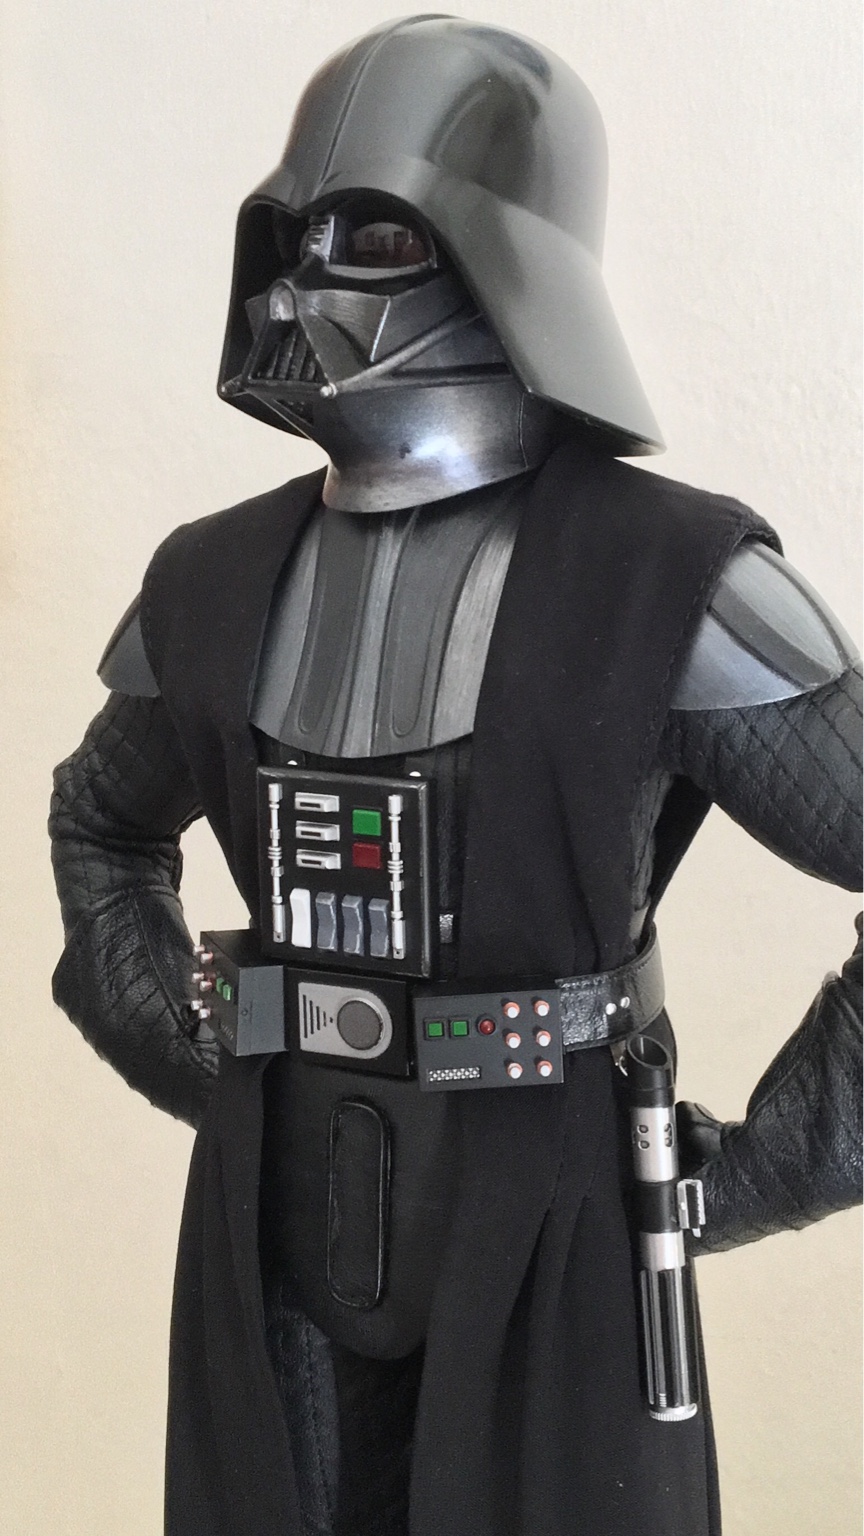
Modded Hot Toys top left and bottom right.
You are using an out of date browser. It may not display this or other websites correctly.
You should upgrade or use an alternative browser.
You should upgrade or use an alternative browser.
Hot Toys Darth Vader : tips , tricks and any other mods
- Thread starter paulcarson
- Start date


Help Support Collector Freaks Forum:
This site may earn a commission from merchant affiliate
links, including eBay, Amazon, and others.
Yep, I would easily say that with all the little mods the Hot Toys Vader HS is one of the most accurate representations of Vader available.
Are those reference images, reproductions, or the original helmets?
Sent from my Motherbox PING PING PING PING PING PING PING PING
Accurate reproductions...but as you say with a few little mods this can be made to look that little more impressive...
Solo_bones
Super Freak
Here's a few pics when i started the mod...just cutting/sinking the plug a little deeper works ok but using a little modeling clay inside the 'nose recess' achieves more of a curved effect and looks better .. View attachment 284277
I'm not clear on the "curved effect" result. It looks like yours is more flat with the clay mod, not curved. Can you please explain in more detail? Th k you.
Here's a few pics when i started the mod...just cutting/sinking the plug a little deeper works ok but using a little modeling clay inside the 'nose recess' achieves more of a curved effect and looks better .. View attachment 284277
I'm sold. I'll likely be adding the modeling clay on my nose to make it look better.
Sent from my Motherbox PING PING PING PING PING PING PING PING
Which is which here???
You can tell the Hot Toys HS by the inaccurate "mouth" and "chin" grill.
The Hot Toys grills look like metal with tiny circular holes, whereas the original looks like a screen you would pick up at a hardware store. The holes are more like a horizontal diamond shape, and slightly rusty.
I was hoping the grill was an easily removable piece glued into the mask from the back, and if you look inside, that's what it looks like, but I can't figure out a way to remove it without really cutting up the interior of the HS and possibly seriously compromising the structural integrity of the HS.
Sent from my Motherbox PING PING PING PING PING PING PING PING
I'm not clear on the "curved effect" result. It looks like yours is more flat with the clay mod, not curved. Can you please explain in more detail? Th k you.
Those are the before pics when i first tried the mod,just the cut plug pushed in deeper..here's a few with clay added that might show the effect better...i put a little clay along the inside bottom edges of the nose recess.. then using the ball-end of a small brush i sculpt/worked it to get the desired curved/concave effect.. View attachment 284354View attachment 284353View attachment 284355
Yeah, that's the best one I've seen, Matrix. Great work. The plug is still in there underneath the clay, right?
Absolute perfection! I've done so much work on mine so far that there's no way I'm not doing the "Matrix nose mod"
What modeling clay did you use? If it worked for you, I trust it.
What modeling clay did you use? If it worked for you, I trust it.
Those are the before pics when i first tried the mod,just the cut plug pushed in deeper..here's a few with clay added that might show the effect better...i put a little clay along the inside bottom edges of the nose recess.. then using the ball-end of a small brush i sculpt/worked it to get the desired curved/concave effect.. View attachment 284354View attachment 284353View attachment 284355
TonTon gets the genius of the week award. I just gently used a scalpel on the nose plug and managed to get it out from the front without having to disassemble the helmet.
While moving it back is easy and improves the likeness a lot, the issue with the plug (besides the bright chrome instead of dull silver it should be) is that extra horseshoe-shaped "lip" that makes it look like there are two noses one inside the other (one black, one chrome)
As Matrix's pics show, it really is supposed to just be a void (no plug at all) with a curved back. So basically, chuck the plug and use something else like the clay Matrix has used. I think I'm going to find a curved piece of plastic and drop it in there and paint it dull silver.
Has anyone enhanced the gunmetal parts on the HT helmet a little? It seems so dull (barely noticeable really) compared to the screen shots. Even though it's nothing like ESB brightness, in ANH you can see the gunmetal vs. black contrast onscreen fairly clearly up close, whereas the HT helmet has very little contrast between the black and gunmetal facets.
I just gently used a scalpel on the nose plug and managed to get it out from the front without having to disassemble the helmet.While moving it back is easy and improves the likeness a lot, the issue with the plug (besides the bright chrome instead of dull silver it should be) is that extra horseshoe-shaped "lip" that makes it look like there are two noses one inside the other (one black, one chrome)
As Matrix's pics show, it really is supposed to just be a void (no plug at all) with a curved back. So basically, chuck the plug and use something else like the clay Matrix has used. I think I'm going to find a curved piece of plastic and drop it in there and paint it dull silver.
Has anyone enhanced the gunmetal parts on the HT helmet a little? It seems so dull (barely noticeable really) compared to the screen shots. Even though it's nothing like ESB brightness, in ANH you can see the gunmetal vs. black contrast onscreen fairly clearly up close, whereas the HT helmet has very little contrast between the black and gunmetal facets.
I thought the same thing. I also thought the "silver" paint was a little too warm in tone.
I repainted all the silver areas gunmetal on mine.
Sent from my Motherbox PING PING PING PING PING PING PING PING
I repainted all the silver areas gunmetal on mine.
Sent from my Motherbox PING PING PING PING PING PING PING PING
Yes the plug is still there with added clay for effect..Yeah, that's the best one I've seen, Matrix. Great work. The plug is still in there underneath the clay, right?
There's lots of 'air drying clay'available (DAS/FIMO) you could use but some homemade clay works just as well and is what i usedAbsolute perfection! I've done so much work on mine so far that there's no way I'm not doing the "Matrix nose mod"
What modeling clay did you use? If it worked for you, I trust it.
Yes the plug is still there with added clay for effect..
There's lots of 'air drying clay'available (DAS/FIMO) you could use but some homemade clay works just as well and is what i used
Cool, thanks man!
Sent from my Motherbox PING PING PING PING PING PING PING PING
Solo_bones
Super Freak
Those are the before pics when i first tried the mod,just the cut plug pushed in deeper..here's a few with clay added that might show the effect better...i put a little clay along the inside bottom edges of the nose recess.. then using the ball-end of a small brush i sculpt/worked it to get the desired curved/concave effect.. View attachment 284354View attachment 284353View attachment 284355
Ah, I see. Thank you sir! So the plug still leaves a lip whereas the clay makes the entire nose seem like it's recessed part of the mask instead of a plug.
BTW, what is home made clay? If i build up the courage to have a go at the nose I'll have do the Matrix nose mod......geez, you guyz is awesome!
To everyone that did the nose mod, I salute you. You all truly have balls of carbonite.
To everyone that did the nose mod, I salute you. You all truly have balls of carbonite.
Maybe mine was like TonTon's (i.e. not much glue) but it really didn't take much effort to get the plug out from the front using a scalpel - and I didn't make a scratch. I then just pulled out the plug, cut a little off the back and slid it right back in so it sits a few mm's further back. And it actually wedged itself in so no glue needed.
I looks way better but I'm still going to go with the "no plug, painted dull silver" route by adding a little curved plastic in the back. Even further back the chrome still looks wrong, and the raised lip is still there, though it's more shadowed so doesn't look anywhere near as bad. The nose mod is probably the one that makes the most difference to me in terms of improving likeness - you suddenly look at it and go "wow."
Before I try adding the curved plastic, I'm going to try just painting the existing chrome plug dull silver, along with the black inside of the nose slot to see how that looks. I have to paint it silver in there anyway.
Glad it worked out for you, Tali!
I'm actually wondering if I should go further with the nose mod. When I initially did it I just shaved it down a tiny bit so that it wasn't sticking out beyond the nose. I ended up glueing it back in so I'm wondering if the bond will be much stronger this time.
I tried the same method on the second helmet I had as well but that one did have a bit more glue and I put a small scratch in the front of the plug. Nothing that couldn't just be painted over anyway but I just gave up since I had done the first one anyway and only have one Vader to display. The second helmet I got has a nicer richer black to the dome though so maybe I'll just give it a go on that one again if the other plug is glued too strongly.
Ah, I see. Thank you sir! So the plug still leaves a lip whereas the clay makes the entire nose seem like it's recessed part of the mask instead of a plug.
BTW, what is home made clay? If i build up the courage to have a go at the nose I'll have do the Matrix nose mod......geez, you guyz is awesome!
Wood glue,flour,cornstarch,olive oil,vaseline and vinegar mixed/knead together makes a nice smooth clay
Wood glue,flour,cornstarch,olive oil,vaseline and vinegar mixed/knead together makes a nice smooth clay
And a delicious, nutritious, snack that's part of this complete breakfast.
Sent from my Motherbox PING PING PING PING PING PING PING PING

Solo_bones
Super Freak
And a delicious, nutritious, snack that's part of this complete breakfast.
Sent from my Motherbox PING PING PING PING PING PING PING PING
LOL!!
Similar threads
- Replies
- 0
- Views
- 587
- Replies
- 0
- Views
- 439
- Replies
- 1
- Views
- 779