Uncle Chewie's CUSTOM Chop Shop!

Collector Freaks Forum

Help Support Collector Freaks Forum:

This site may earn a commission from merchant affiliate links, including eBay, Amazon, and others.
Looks great Ryan. Nice job!

I am currently resculpting an extra ANH Han Solo head I have for my ESB Han. Adding some sculpy to make the hair look like ESB.

I will try to post some pics soon.
 
I picked up some Moulding Alginate and Resin Plaster at the Art shop today - going to try my hand at casting some heads/helmets/armour parts. The house will get messy and the air will turn blue before we see anything usable... but I'll keep you posted. I shall of course be posting pictures of any results (failures or otherwise as I know you all like a good laugh at my expense!)

DG
 
ow gooody goody, we have not had a tango trooper incident for ages!! Cool I could do with a laugh. Life is all to serious at the moment, work is not floating by boat atm. We have been talking about upping sticks and moving (Mrs won't let me move to the west country, can't think why). :(
 
I picked up some Moulding Alginate and Resin Plaster at the Art shop today - going to try my hand at casting some heads/helmets/armour parts. The house will get messy and the air will turn blue before we see anything usable... but I'll keep you posted. I shall of course be posting pictures of any results (failures or otherwise as I know you all like a good laugh at my expense!)

DG

Cool let me know if u wanna borrow some helmets etc, as long as it dont mess em up cos i know bugger all about recasting.

ow gooody goody, we have not had a tango trooper incident for ages!! Cool I could do with a laugh. Life is all to serious at the moment, work is not floating by boat atm. We have been talking about upping sticks and moving (Mrs won't let me move to the west country, can't think why). :(

Soz to hear that m8 i hope things pan out. The west country is nice though :peace
 
was actually thinking of dremmeling away the face from an ESB Han and "inserting" the Indy face/ sculpt in it's place. Have no idea if it would actually work. I have molds/ casts of both so thought I would give it a try. Thnk someone else on the boards did something similar with an obi wan sculpt with pretty good results? not sure.
 
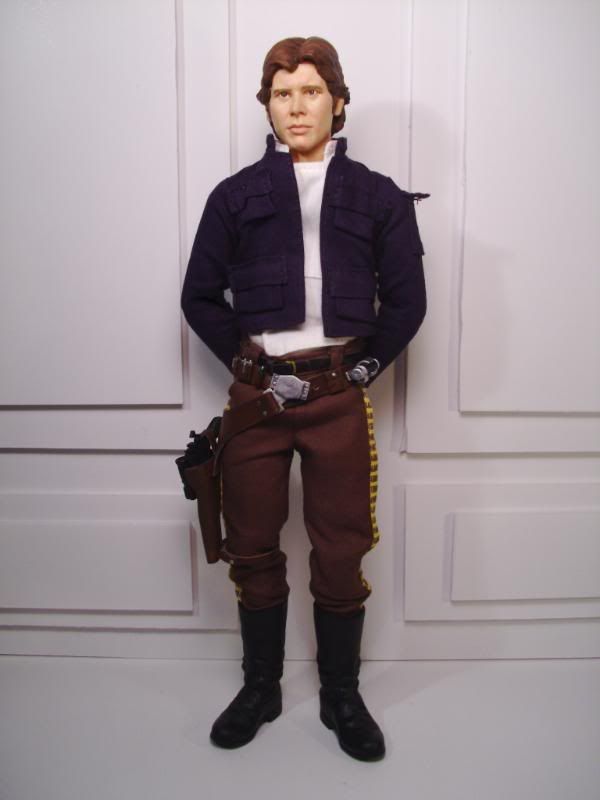
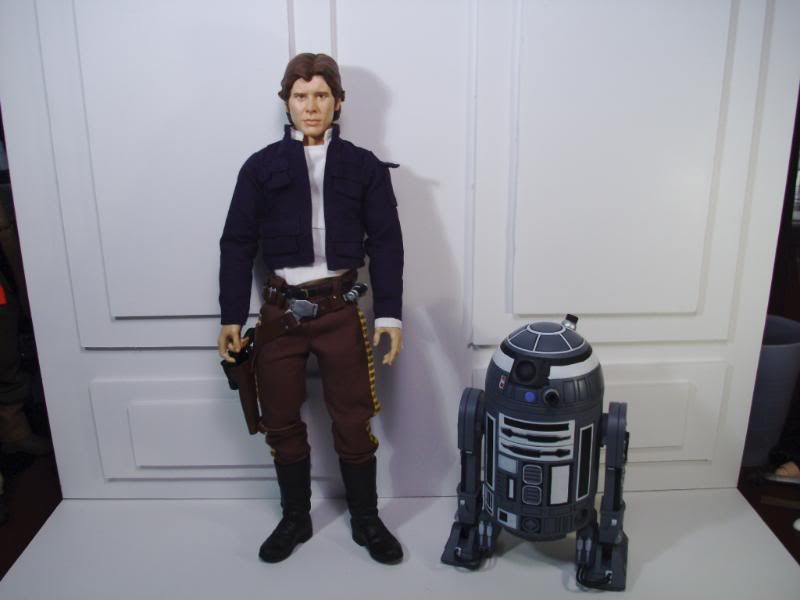
redid the esb han. made a mold/ cast of the anh han head and used it on this version. i actually like this sculpt. best han we have out yet so it makes do. also changed out the SS boots for dragon jackboots. really like the look of them.

hanr2q2018.jpg

hanr2q2001.jpg

big improvement with the other head, but gah I hate their coat!!!!!!!!!
 
O.M.G. :horror


Dorgs, you wanted a laugh. Give me half hour to an hour and you'll be bellyaching like me.

Let's just say my first attempt at casting was about as successful as a Yorkshire Terrier trying to get it on with a Great Dane!

Fortunately - for you, I have documented it. If I salvage anything from this attempt it won't be my pride!

Just off to scrape the Kitchen table before Susy comes in and see's the mess I've made. :monkey1

DG
 
OK. Here we go.
This was meant to be a Tutorial in how to cast a head. It turned into a Morality play with the theme "A little knowledge is a dangerous thing!"

So without further A-do, I give you... Moulding & Casting 101 (Or if you prefer: He who is without sin, shall cast the first head!)


1) All the things you need, Boxes of stuff, cup of Tea and a small bar of Chocolate!
<a href="https://s593.photobucket.com/albums/tt20/Darthgothikus/Casting%20Stones/?action=view&current=Cast1.jpg" target="_blank"><img src="https://i593.photobucket.com/albums/tt20/Darthgothikus/Casting%20Stones/Cast1.jpg" border="0" alt="Photobucket"></a>

2) Something to Cast!
<a href="https://s593.photobucket.com/albums/tt20/Darthgothikus/Casting%20Stones/?action=view&current=Cast2.jpg" target="_blank"><img src="https://i593.photobucket.com/albums/tt20/Darthgothikus/Casting%20Stones/Cast2.jpg" border="0" alt="Photobucket"></a>

3) A receptacle
<a href="https://s593.photobucket.com/albums/tt20/Darthgothikus/Casting%20Stones/?action=view&current=Cast3.jpg" target="_blank"><img src="https://i593.photobucket.com/albums/tt20/Darthgothikus/Casting%20Stones/Cast3.jpg" border="0" alt="Photobucket"></a>

4) Alginate
<a href="https://s593.photobucket.com/albums/tt20/Darthgothikus/Casting%20Stones/?action=view&current=Cast4.jpg" target="_blank"><img src="https://i593.photobucket.com/albums/tt20/Darthgothikus/Casting%20Stones/Cast4.jpg" border="0" alt="Photobucket"></a>

5) Once poured, let set for 10 minutes and turn out.
<a href="https://s593.photobucket.com/albums/tt20/Darthgothikus/Casting%20Stones/?action=view&current=Cast5.jpg" target="_blank"><img src="https://i593.photobucket.com/albums/tt20/Darthgothikus/Casting%20Stones/Cast5.jpg" border="0" alt="Photobucket"></a>

6) Now things start to go wrong. I forgot to mark where the front of the head was. The next step is to split the mould and you don't want the seam running through his face. I had a pretty good idea where to cut though.


Bugger. Not only did I cut down the middle of his face, there's a nice big air bubble right on his eye!
<a href="https://s593.photobucket.com/albums/tt20/Darthgothikus/Casting%20Stones/?action=view&current=Cast6.jpg" target="_blank"><img src="https://i593.photobucket.com/albums/tt20/Darthgothikus/Casting%20Stones/Cast6.jpg" border="0" alt="Photobucket"></a>

7) No problem. This is only a test, so chalk that up to experience! Next step cut a hole in bottom of cup and re-insert the two halves of the mould. Simply fill with plaster and allow to set for half an hour.
<a href="https://s593.photobucket.com/albums/tt20/Darthgothikus/Casting%20Stones/?action=view&current=Cast7.jpg" target="_blank"><img src="https://i593.photobucket.com/albums/tt20/Darthgothikus/Casting%20Stones/Cast7.jpg" border="0" alt="Photobucket"></a>
Starting to get messy now - but still kind of going to plan.
<a href="https://s593.photobucket.com/albums/tt20/Darthgothikus/Casting%20Stones/?action=view&current=Cast8.jpg" target="_blank"><img src="https://i593.photobucket.com/albums/tt20/Darthgothikus/Casting%20Stones/Cast8.jpg" border="0" alt="Photobucket"></a>

8) Crap. As I'm pouring plaster in the top didn't notice it running straight out the bottom! Emergency run to the sink.
<a href="https://s593.photobucket.com/albums/tt20/Darthgothikus/Casting%20Stones/?action=view&current=Cast9.jpg" target="_blank"><img src="https://i593.photobucket.com/albums/tt20/Darthgothikus/Casting%20Stones/Cast9.jpg" border="0" alt="Photobucket"></a>

9) It's all turned to s***! mould has fallen to bits, plaster is all over the room and I can hear the wife approaching! I'm either about to get boll***ed, or ridiculed, on second thoughts, it'll be both!
Oh and I should point out, this is my "Art's & Crafts Sink" not one we actually wash up in! Euch!
<a href="https://s593.photobucket.com/albums/tt20/Darthgothikus/Casting%20Stones/?action=view&current=Cast10.jpg" target="_blank"><img src="https://i593.photobucket.com/albums/tt20/Darthgothikus/Casting%20Stones/Cast10.jpg" border="0" alt="Photobucket"></a>

That's my ten pics in a post limit I think? Part two to follow shortly, where our intrepid hero tries to salvage something from this debacle and blames everyone but himself!
 
Caste-a-farce Pt 2.

1) So I thought I would turn out what was left after the plaster set, obviously it's not going to be any use, but I might as well play this through to the end.
<a href="https://s593.photobucket.com/albums/tt20/Darthgothikus/Casting%20Stones/?action=view&current=Cast11.jpg" target="_blank"><img src="https://i593.photobucket.com/albums/tt20/Darthgothikus/Casting%20Stones/Cast11.jpg" border="0" alt="Photobucket"></a>
<a href="https://s593.photobucket.com/albums/tt20/Darthgothikus/Casting%20Stones/?action=view&current=Cast12.jpg" target="_blank"><img src="https://i593.photobucket.com/albums/tt20/Darthgothikus/Casting%20Stones/Cast12.jpg" border="0" alt="Photobucket"></a>
<a href="https://s593.photobucket.com/albums/tt20/Darthgothikus/Casting%20Stones/?action=view&current=Cast13.jpg" target="_blank"><img src="https://i593.photobucket.com/albums/tt20/Darthgothikus/Casting%20Stones/Cast13.jpg" border="0" alt="Photobucket"></a>

2) Now on the positive side, in the areas that aren't full of air bubbles the detail is pretty good! If the mould hadn't fallen apart, the head should be in one piece and just need a little sanding on the mould line.
<a href="https://s593.photobucket.com/albums/tt20/Darthgothikus/Casting%20Stones/?action=view&current=Cast14.jpg" target="_blank"><img src="https://i593.photobucket.com/albums/tt20/Darthgothikus/Casting%20Stones/Cast14.jpg" border="0" alt="Photobucket"></a>
<a href="https://s593.photobucket.com/albums/tt20/Darthgothikus/Casting%20Stones/?action=view&current=Cast15.jpg" target="_blank"><img src="https://i593.photobucket.com/albums/tt20/Darthgothikus/Casting%20Stones/Cast15.jpg" border="0" alt="Photobucket"></a>

3) It's all your fault Dammit! If you hadn't sneezed while I was pouring the plaster, none of this would have happened!
<a href="https://s593.photobucket.com/albums/tt20/Darthgothikus/Casting%20Stones/?action=view&current=Cast16.jpg" target="_blank"><img src="https://i593.photobucket.com/albums/tt20/Darthgothikus/Casting%20Stones/Cast16.jpg" border="0" alt="Photobucket"></a>


So what have I learned (apart from don't cast stuff?)

1) I think the Algenate need to be more runny when I mixed it. It would have filled the mould better and perhaps avoided the air bubbles.

2) Should have made a mark where I needed to split the mould.

3) The Alginate didn't comletely fill the cup, so when I turned it over to pour the plaster in, there was a gap between the mould and the table. That let the plaster run through (I also realised after pouring that the cup had a plastic lid which I had thrown away - Doh! Would have contained the plaster and kept the head in one piece).

4) Going to give this another try and see if I can iron out some of the hickups. Have realised though that even if it works perfectly, I'll end up with a head that needs to be attached to a neck somehow? So need to drill out the inside and fit a joint of some kind... Hmm this isn't straight forward.

5) At least the process didn't damage the original in any way!

6) If I get no joy with a few more attempts, I know there are other ways of creating moulds and casting (This was just what my local art shop had in stock so I gave it a whirl) I'll try another process.

Hope you all enjoyed this informative lecture and take something valuable away with you, like a certain knowledge that there is always someone more inept than you out there willing to make a fool of themselves. Goodnight!
 
DG, I think the best way is for you to give the head a few coates of silicon rubber then pour your plaster over that, that way you will get more detail & more copies, your biggest issue then will just be the minor air bubbles.
So steps are
1. coate in silicon
2. pour plaster in as before/you could even try thin card (I've seen playing cards used) or styrene in between front & back of head
3. let set then split front & back pieces
4. leave silicon as a single piece, it shold be flexible enough to get your original head out no problems.
5. Reassemble mold with silicon in place and pour resin etc in. let set

I've done this method once, (my 1st attempt at casting) & my only issues where minor bubbles & the resin not setting in the base of the mold. the resin makes a near perfect copy
 
1) All the things you need, Boxes of stuff, cup of Tea and a small bar of Chocolate!

:rotfl Best tutorial ever! Man, I've had such a craptastic day but DG I was crying with laughter reading this post. Anyway, I thought it was a brilliant first attempt and look forward to further instalments.
 
LOL Dg its great what are you on about!! So there is a few creases to iron out... or hammer out. But its inspired me to have a go as soon as I get chance. I also bought some gedo stuff yesturday!! How odd. Some siligum and resin, but the resin was clear. How tough is the resin plaster! Gonna be great....

But I will wit till the mrs goes out.. shes a bit OCD. and who are you kidding about the "Arts and Craft sink"... Thats your bath that is, you bath in that....
 
Thanks guys!

The "Silicon" route was my first choice but the shop didn't have any in stock, so as this was on the shelf I thought I'd give it a go, nothing ventured, nothing gained.

Happy to brighten your day DD! Hopefully take two will be less amusing but more successful!

If I finish all my paying work this afternoon I might have another bash tonight, if not it'll be sometime next week.

I do actually enjoy all this farting about, and the forum is a great place to share these miss-deeds!

Keep Creating!
DG


Edit: You rumbled me Dorgs! and that was after I had bleached it - twice!

The Resin Plaster is a little brittle on fine details as you would expect but the detail it holds seems pretty good. I guess that is the trade off. Also (where there are no air bubbles) the finish is as smooth as a babies bum, so the small detail in his ears etc look really nice and sharp!
 
Last edited:
Back
Top