bebe13junior
Super Freak
- Joined
- Jul 30, 2014
- Messages
- 3,362
- Reaction score
- 627
When I can get it on I will.
Were you ever able to get the head on?
Sent from my iPhone using Tapatalk


When I can get it on I will.
Thanks for posting those photos; they WILL help me when I sculpt the David Prowse head. They'll help me get the size of the head right, and the length of the neck.Something I've had for a while, a couple of photographs that may help with Vader's proportions. I've used this to construct a custom body for my Vader. Dressed it gives " the look" .
Hope they help.")


I think the ones of Shapeways look good too.

Happy to help.
A little something I've been working away on. Completely built from scratch. The rods are from the Rogue one figure and the coin slots are from the ANH Vader figure. Some of the lines are slightly off but I'm planning to rework these when I find some free time.
View attachment 428116
View attachment 428115
 Where did you find those green and red plastic pieces? I’ve been looking for control panel type thingies like those for a while now.
Is there something so wrong about the HT chest box that makes it worth constructing a custom-corrected one?
Looking like it’s coming along really well
I hope you didn't think I was trivializing your work- it's looking great. I just didn't know if there's something really dimensionally inaccurate about the stock HT chest box or not, and I know how much work projects like this require; I do them myself often. I'm just focused on fixing the things that stand out as obviously wrong, such as the nose, grill, belt, shoulder/chest armor, etc.There are differing opinions on the chestboxes , I suppose it's down to personal preference. I have a vision of how I want my Vader to look ( as I'm sure many others do ) I'm just giving it all the little touches that gives it the character it deserves. I love The character. Something as iconic as Vader should be given the respect it deserves and I'm slowly working on it. I don't think that there will be any original untouched parts on this when it is completed. I've made custom cloak and inner tunic, totally revamped the boots to look as they should have done, resculpted a set of shins with accurate shape and fit. The helmet and mask have been completely overhauled etc etc.
Going back to the chestbox, it will be accurately proportioned when I'm done. I have incorporated locating holes for the rods and coin slots so that it will be easier to attach parts once painted. I'm going to be taking a mould from all my "custom parts" as I'm sure that it will be a matter of time before I get the itch to add an accurate ESB version to my shelf also and having the parts ready made so to speak will save me an awful lot of work.
Is there something so wrong about the HT chest box that makes it worth constructing a custom-corrected one?
I hope you didn't think I was trivializing your work- it's looking great. I just didn't know if there's something really dimensionally inaccurate about the stock HT chest box or not, and I know how much work projects like this require; I do them myself often. I'm just focused on fixing the things that stand out as obviously wrong, such as the nose, grill, belt, shoulder/chest armor, etc.
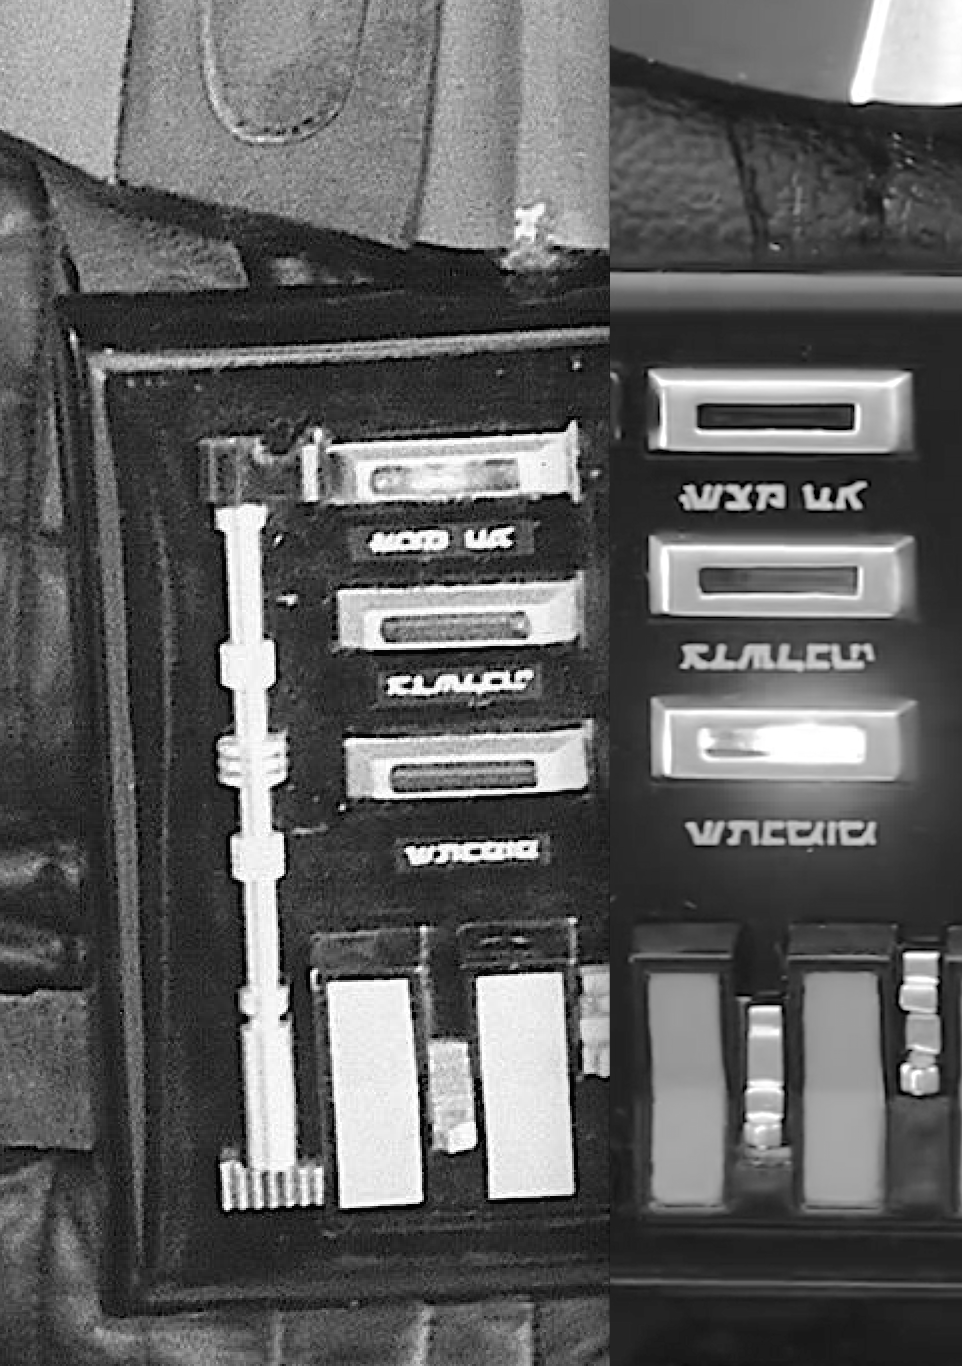
I just noticed something from the real prop photo on the left: The 'coin slots' are exactly the same as the virtical row of small shapes that are located on R2D2, to the left of the central vents on R2's belly. Knowing the habits of prop makers, they were almost certainly cast from the same mold for R2 and Vader. With that in mind, you could take an impression from them on the HT R2, make a small mold, and cast perfect copies to use for your ESB chest box.It's an improvement over the Sideshow DX one for sure (which is a whisker too small, aside from other inaccuracies,) but it's certainly not a bullseye. This pic probably shows the issues best... the prop box is on the left, HT box on the right, both box frames and vertical switches made the same size for comparison.
You can see the coin slots are vertically too big (or fat) and the vertical switches, while overall the right size, are too narrow in the way they are finished. The combination of the switches being the right size but the coin slots being too fat is what make it seem slightly off at a glance, because the coin slots are supposed to be skinny.
[

No, not at all. I just find it difficult to stop at just one fix for things!
@WTC, wow what a project! Are you changing the chin part because of the vent size only, or is there anything else shape wise that you prefer on the ANH chin?
I seem to recall someone was looking for a photograph of Vader's ANH boots.
Hope these help.
View attachment 428038

Enter your email address to join: