1/6 Hot Toys Custom Hall of Armor Projects / Display Base Mods

Collector Freaks Forum

Help Support Collector Freaks Forum:

This site may earn a commission from merchant affiliate links, including eBay, Amazon, and others.
Re: Hot Toys Custom Hall of Armor Projects

Thanks for the responses!

Hockeyflow33, thanks; that's an interesting observation. What is the voltage and amperage of the power adapter you are using?

Boba Debt, I am very willing to try your idea; thanks for the suggestion. How difficult is it to open up one of these, and how do I reattach the wire assuming I want to reattach it to the adapter socket? Will I need to solder it?
 
Re: Hot Toys Custom Hall of Armor Projects

Hockeyflow33, one other question about your setup: do you have all 7 halls connected together in a row?
 
Re: Hot Toys Custom Hall of Armor Projects

Hockeyflow33, one other question about your setup: do you have all 7 halls connected together in a row?

I only have five up now and I'm using the amperage that they suggested. I think it's a 2A 4.5?


Sent from my iPhone using Tapatalk
 
Re: Hot Toys Custom Hall of Armor Projects

Have you isolated it down to a single unit yet?


Removing the bottom is not hard but you have to be careful.

The wires to the battery box are very thin and fragile but if you never have plans to put batteries in it you can just cut them.

The socket is attached to the back plate with hot glue but the wiring is in the base so you have to pop it loose once you get the bottom loose.

To get the bottom loose you just remove the screws and pry it from the back edge

If you open it up and see the blue wire is not attached to the same solder tab as the black wire you will either have to solder it to the tab (hard to do) or make the decision to do it the easy way, cut the battery box wires, cut the wires to the socket and then short the blue wire to the black wire and insulate the red wire


If your units are attached in a single row, to each other, you can not use multiple power supplies with out insulating the contacts between 2 of the bays, otherwise the power from each unit will feed into the opposing unit.

One 1 amp power supply should be strong enough to run 7 units.
 
Re: Hot Toys Custom Hall of Armor Projects

Have you isolated it down to a single unit yet?
Not yet; I've been at work all day. That will be tonight's project! I'll keep this thread posted with my results.


Removing the bottom is not hard but you have to be careful.

The wires to the battery box are very thin and fragile but if you never have plans to put batteries in it you can just cut them.

The socket is attached to the back plate with hot glue but the wiring is in the base so you have to pop it loose once you get the bottom loose.

To get the bottom loose you just remove the screws and pry it from the back edge

If you open it up and see the blue wire is not attached to the same solder tab as the black wire you will either have to solder it to the tab (hard to do) or make the decision to do it the easy way, cut the battery box wires, cut the wires to the socket and then short the blue wire to the black wire and insulate the red wire.


If your units are attached in a single row, to each other, you can not use multiple power supplies with out insulating the contacts between 2 of the bays, otherwise the power from each unit will feed into the opposing unit.
Thank you. If I am able to isolate the issue to one bay, I'll make an attempt at this.

One 1 amp power supply should be strong enough to run 7 units.
That's good to know; I was getting worried the lights might start to dim with that many halls being powered by one power supply.

Thanks again for the help!
 
Re: Hot Toys Custom Hall of Armor Projects

So this gets more interesting...

I was busy trying Boba Debt's suggestion of testing each unit connected to a known good unit. First off, in truth, I'm not 100% sure I had a good unit. I picked one that lit up correctly when I plugged the power supply into it; I believe it was the 1st one on the left, as I had them initially arranged (that may be valuable info in a moment). I began testing each additional unit by connecting it to the right of the "good unit." The first two I individually tested lit up correctly, but the 3rd one did not. That's when I began to wonder if the problem Boba Debt described was in the original "known good unit" or the 3rd one I hooked up to that unit.

To try to make that determination, I disconnected the 3rd one from the original "good unit" and hooked it up to the other side of that original unit - to the left-hand side of it. To my surprise, it lit up correctly. So, I left it on the left side and began connecting the rest of the units, to the right of these two. In a nutshell, everything lit up correctly. I was able to light up all 7 units, using the power supply, correctly.

So, everything seems to be working just fine, as long as I keep that one unit - the one that would not light up on the right-hand side of the 1st unit - on the left-hand side of it.

This leaves me with a few questions:

1. Since everything seems to work as long as I keep that one unit on the left, is the issue still possibly a disconnected blue wire inside one of the units?
2. If there is a disconnected wire, in which unit is it...the first "known good" one, or the 3rd one I tried connecting to it that only works on the left-hand side?
3. Most importantly, should I bother trying to fix this problem since everything works in its current arrangement?
 
Re: Hot Toys Custom Hall of Armor Projects

If the blue wire is disconnected the unit will not work from a power supply.

I would not bother trying to fix the bad unit as long as it works.
 
Re: Hot Toys Custom Hall of Armor Projects

If the blue wire is disconnected the unit will not work from a power supply.

I would not bother trying to fix the bad unit as long as it works.
OK, that's what I figured, but I wanted to be sure this isn't going to do any long-term damage to these units.

Thanks!
 
I thought I'd show a picture of my progress so far; my shelf is done and installed, the halls are all wired up, and everything is working. I do have two questions:

1. The plexiglass window that goes in front of each character sits in the groove in the bottom, and the top leans all the way in until it comes to rest against the front of the plastic rim around the "ceiling" light. In other words, the top leans in much farther than the bottom does; it doesn't stand upright. Is that the correct installation for these?

2. I am using a 4.5v 1.0a power adapter to illuminate everything (no batteries). All the lights look really cool, but they are not quite as bright as I thought they would be. Two particular things I noticed were a) the side walls light up fairly brightly at the ends and in one spot directly in the middle of each wall, but other spots are not nearly as illuminated and as a result, the walls are not uniformly bright; b) the other lights inside the hall do not illuminate the one figure I have in there (so far) quite as brightly as I thought they would. I am including a picture that is fairly representative of the brightness level I'm seeing. Does this seem like the appropriate brightness? All the halls seem to exhibit this same relative level of brightness.

By the way, the super-bright area below the 7 halls is a shelf beneath the halls; it is being illuminated by LED tape lights inside. I have a dimmer for it, in case I want to tone down the lights, but they are not actually as bright as this picture shows!

17162303712_5bddfee3ac_c.jpg
 
I can't help with the Plexiglas window but I can speak to the electrical question.


Current is only the "volume" of electricity available. Voltage is the "pressure" and is restricted to the requirement of the circuit.


A circuit will only draw as much current as it requires, the rest just sits there doing nothing.

Increasing the amperage will not make it brighter. Increasing the voltage will make it brighter for a short while and then it will burn up the circuit so do not go more the 4.5 volts.

Yu could try using 2 power supplies, one for the bases and one for the walls perhaps, but I don't think it will make a difference.

If everything is hooked up in parallel you should not be dropping voltage but if you somehow created a series parallel circuit you could be dropping voltage which will make your lights dimmer.


That may sound complicated but when you get in to that type of circuit there are so many variables that I could not possible address them all.
 
If everything is hooked up in parallel you should not be dropping voltage but if you somehow created a series parallel circuit you could be dropping voltage which will make your lights dimmer.

That may sound complicated but when you get in to that type of circuit there are so many variables that I could not possible address them all.
Thanks. It is a little bit complicated, but what I can do is explain how I wired it and maybe you can comment on whether you think I might be dropping voltage.

I made fake batteries for each side wall, with a small amount of wire coming out the back of the battery door. I wire nutted additional 20-gauge wire to the wire coming from each wall, to extend the wire length. I took the 4.5v 1.0a power adapter and cut the cord in half, splicing both cut ends. I plugged the adapter end into the base lighting jack on the back of the left-most hall.

I had 10 wires at this point (8 wires coming from the walls, one from the base lighting jack, and one from the power adapter. I wire nutted all 10 together. I did this for both the reds as well as the black wires. I then plugged the power adapter into the wall socket. Everything lit up.

Does this info help you to know if I made any electrical mistakes?

As an aside, I also put some pictures in the Hall of Armor Thread, and in doing so, I noticed that the brightness level of my Halls seems similar to the pictures of other peoples' halls. So, maybe I just had false expectations?
 
Sounds like you wired it up in parallel so this should be working fine
Thanks. The more I look at other pictures on this site, the more I think this is just the way these units are meant to look. It's not bad...just dimmer than I thought. The lighting doesn't evenly light up the figures (the top part of the figures is brighter than the bottom), and the overall brightness level is not as high as I was expecting. It may also be the fact that my overall lobby lighting is fairly dim. It does still look very cool, however!
 
HALL OF ARMOR HOUSE PARTY PROTOCOL WINE CELLAR PROJECT


This project has been brewing ever since the HPP HOA bays were released.

However, my original concept had to evolve to work with the Hulk Buster and to some extent Igor.

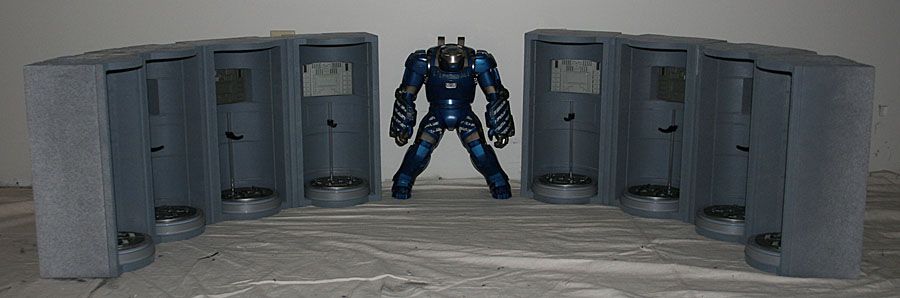
This is going to be the layout of my Wine Cellar that will be the bottom section of a larger display that is comprised of several dioramas including Tony’s workshop, the Gantry and even a containment center for the villains.


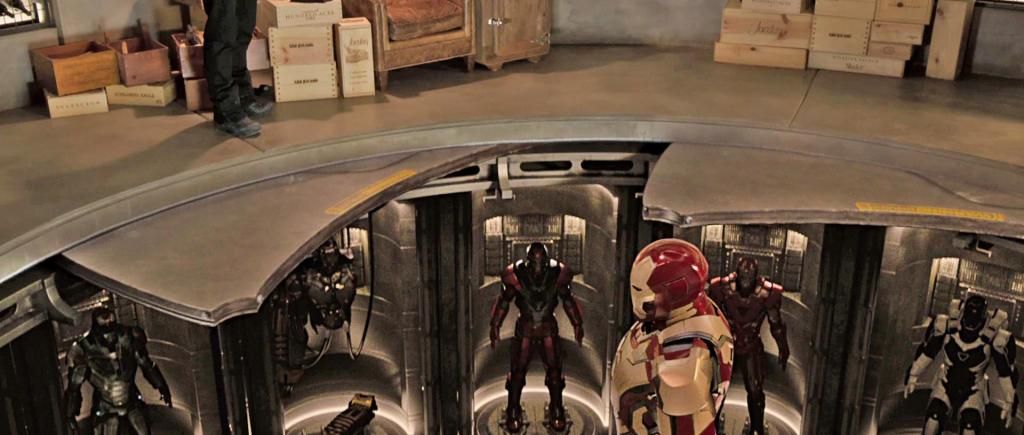
My wine cellar will not be the typical display, I want it to look like the version from the movies that you get a quick glimpse of in IM3


As you can see there are dividers between each bay and a circular floor between the levels. The bays also look like they are made from concrete.


So far I have 10 on hand and 4 on the way. I still need to buy 6 more but I like to cash flow projects like this so I have the earn the money before I spend it.

While saving up to buy the last 6 bays I decided to figure out a way to connect the bays and make them look like concrete.

This is what I came up with so far:


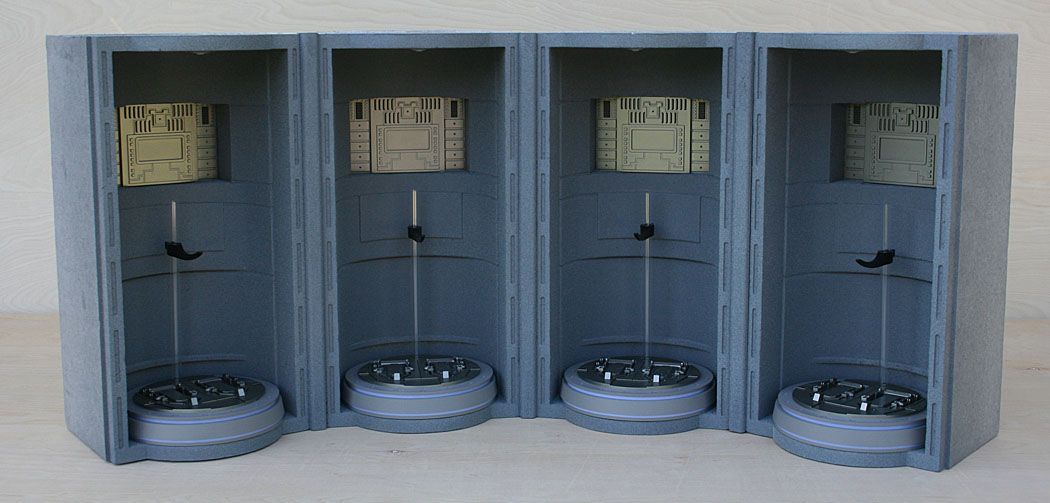
The dividers are made from 3/4” and 1/4” plywood to save weight and a solid wood trim piece for the part you see. I use latex painters caulk to attach the divider to the bay and then I attach the front trim with 2 brads.

The color an texture is created with a 2 step painting process. I prime the assembled units with Rust-Oleum American Accents 2X Ultra Cover Primer and then apply a top coat of Krylon Natural Stone Textured Finish in Granite.


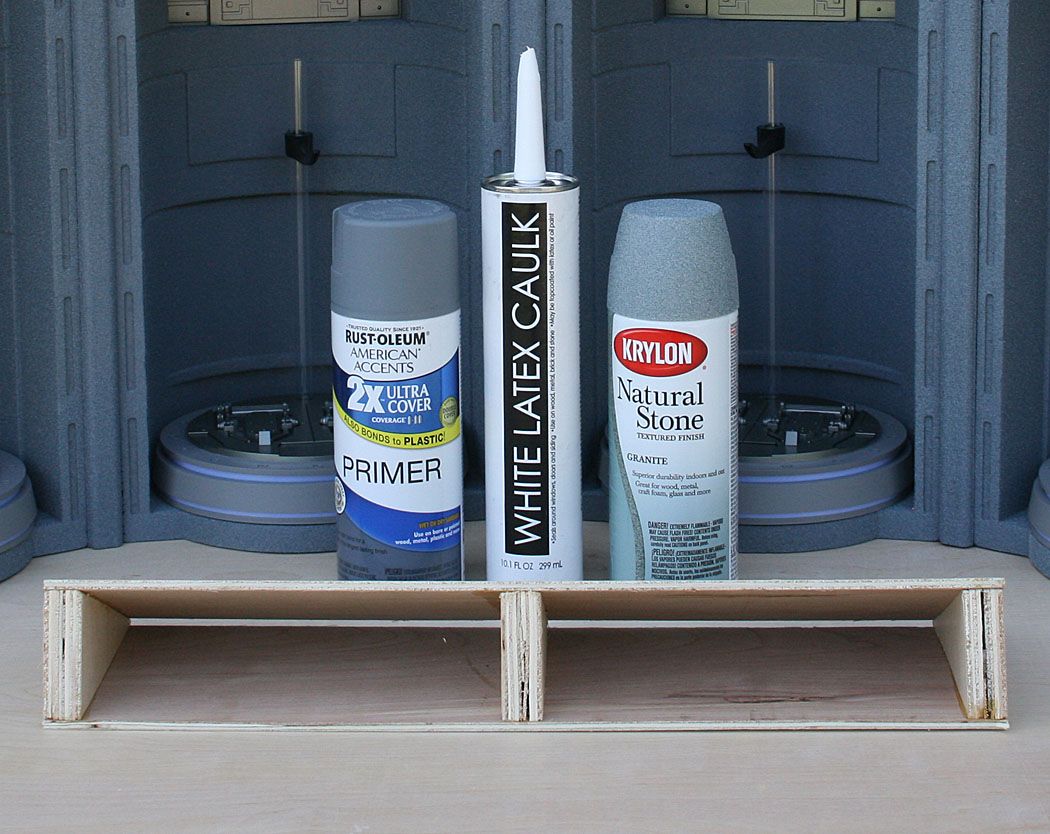
Both paints are dry sprayed. That means I spray several light coats from about 24” away so that most of the flammable carrier can evaporate before the paint hits the foam.

It took almost and entire can of primer and half a can of the Granite to achieve this look.

I plan on doing these as 8 subassemblies that will be assembled in the display area and then I will apply a final light coat of Granite to blend them all together.

I am really looking forward to this project but it is a long term endeavor so I have to be patient.


Last edited:
Thanks. It looks like getting the rest will be difficult :(

I posted a trade offer in the HPP HOA thread, hopefully someone has 6 of these they want to get rid of.


BTW: I added 2 simple display base modifications to the original post.

I'm trying to consolidate this type on info to one thread.
 
Started to work on the second set of 4 bays, should have them done by tomorrow.

If that works out I can start on the custom Igor bay which is what I'm really looking forward to.


As a side note, I read the other thread about these and it reminded me of all the hate people had for these, mostly because they are made from styrofoam and you can easily see that by looking at them.


I'm just glad I was able to was able to deliver on my promise to find an inexpensive way to paint these to make them look movie accurate and it doesn't surprise me in the least that none of the haters have swallowed their pride to admit it.
 
They do look much better now with your paint job. But wasn't as much of the hate based on the price (given that they are made out of styrofoam) as on the look?
 
HALL OF ARMOR HOUSE PARTY PROTOCOL WINE CELLAR PROJECT


I finished the second set of four today

The display measure about 65" across and about 30" deep.

Now I need to get busy on Igor's bay
HOA%20HPP%20004_zps2xwxqubk.jpg
 
Back
Top