1/6 SS: 1/6 General Grievous MODIFICATION & photography thread

Collector Freaks Forum

Help Support Collector Freaks Forum:

This site may earn a commission from merchant affiliate links, including eBay, Amazon, and others.
Damn Rory this is good work! Any tips on what you did to the cape? That alone changes the look a lot IMO.
 
Hunch Mod. More on that later. Pics now.
g.jpg
e.jpg
b.jpg
h.jpg
r.jpg
o.jpg
q.jpg
 
Looks good Mark! What's the tube at the back of the neck?

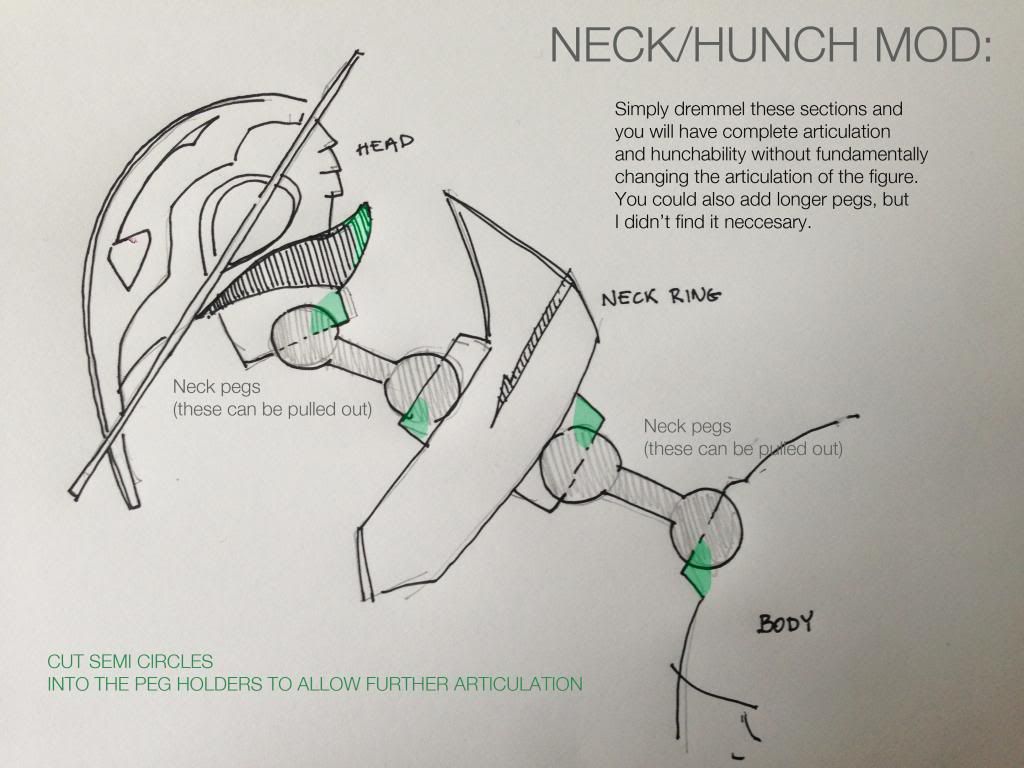
Here's the breakdown of what I did as promised last week, sorry been bogged down at work. Excuse the crude drawings, it's hard to explain any other way. This is super simple to do, and doesn't damage your figure in any visible way...
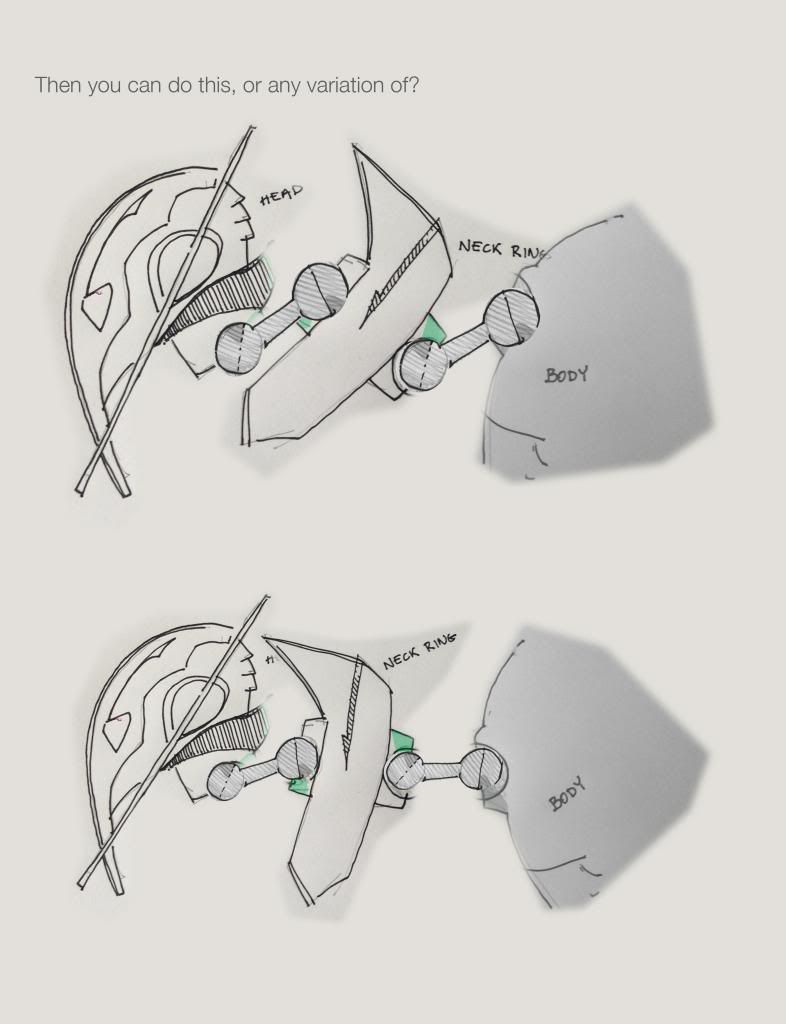
I found the hunch was reasonably straightforward, the trick is getting the face to be able to tilt/look upwards when he is hunched over? this solves that issue..

First do this:


Then you can do this:


Last edited:
Awesome hunch, McHaley! :clap

And that battle pose is outstanding!

And Rory, excellent instruction sheet. I'm tempted. My concern, on my figure personally, is that the head is somewhat lose so I fear cutting out anything that helps hold its position. Also when you separate the head and neck (collar) does the rubber stuff come out with it? I've been busy with Gothmog this past week but I want to get back to Grievous again.
 
And Rory, excellent instruction sheet. I'm tempted. My concern, on my figure personally, is that the head is somewhat lose so I fear cutting out anything that helps hold its position. Also when you separate the head and neck (collar) does the rubber stuff come out with it? I've been busy with Gothmog this past week but I want to get back to Grievous again.

The rubber stuff is so easy to remove and reattach, all that is sticking it is a drop of crazy glue. I actually gave mine a little silver dry brushing when I had it off and it looks a lot better. Also you can tighten the head joint easily once you pop it off the ball, just put a few drops of glue or varnish, or paint and it will thicken the ball ever so slightly stiffening the joint?
 
I think my post was lost in the flood of posts :p

Any tips on the cape?

And thanks for the instruction sheet! I'm doing that as soon as I get mine!
 
I was originally going to use these 1/8" armature joints for Grievous' spine (as they are the correct shape) and pose his head/neck from there. I would have had to split his body in two to anchor it though, so I used them as the new neck joints instead. Using a piece of split tubing as his spine. The tubing is farther away form accurate, but I'm fine with it and it's easily adjustable when you pose the neck/head.
There's a screw going up into the neck joint with the head cut off, going back down into the body (drill small hole). When screwing it in, this just gets the base/ball joint of the neck into the hard plastic body...that isn't as flexible as the other sockets.
I covered the joints in Shrink Tubing.

At first, I had his neck and under-neck out a bit far...Gave him awesome hunch, but solid as the joints were, the figure looked less solid to me.
3.jpg
I took out a joint for the upper and lower necks, added a Y connecter for his head to connect to (removing part of the "Y").
2.jpg
This is what it looked like at first:
1.jpg
And now:
5.jpg
I also used Shrink Tubing to extend his Throat Tubes, etc. I'll revisit this at some time, replacing as much as I think looks better.
Again. 1st Try:
l.jpg
2nd Try:
4.jpg
 
Back
Top