p3ss3ssod
Freaked Out
- Joined
- Aug 27, 2019
- Messages
- 221
- Reaction score
- 617
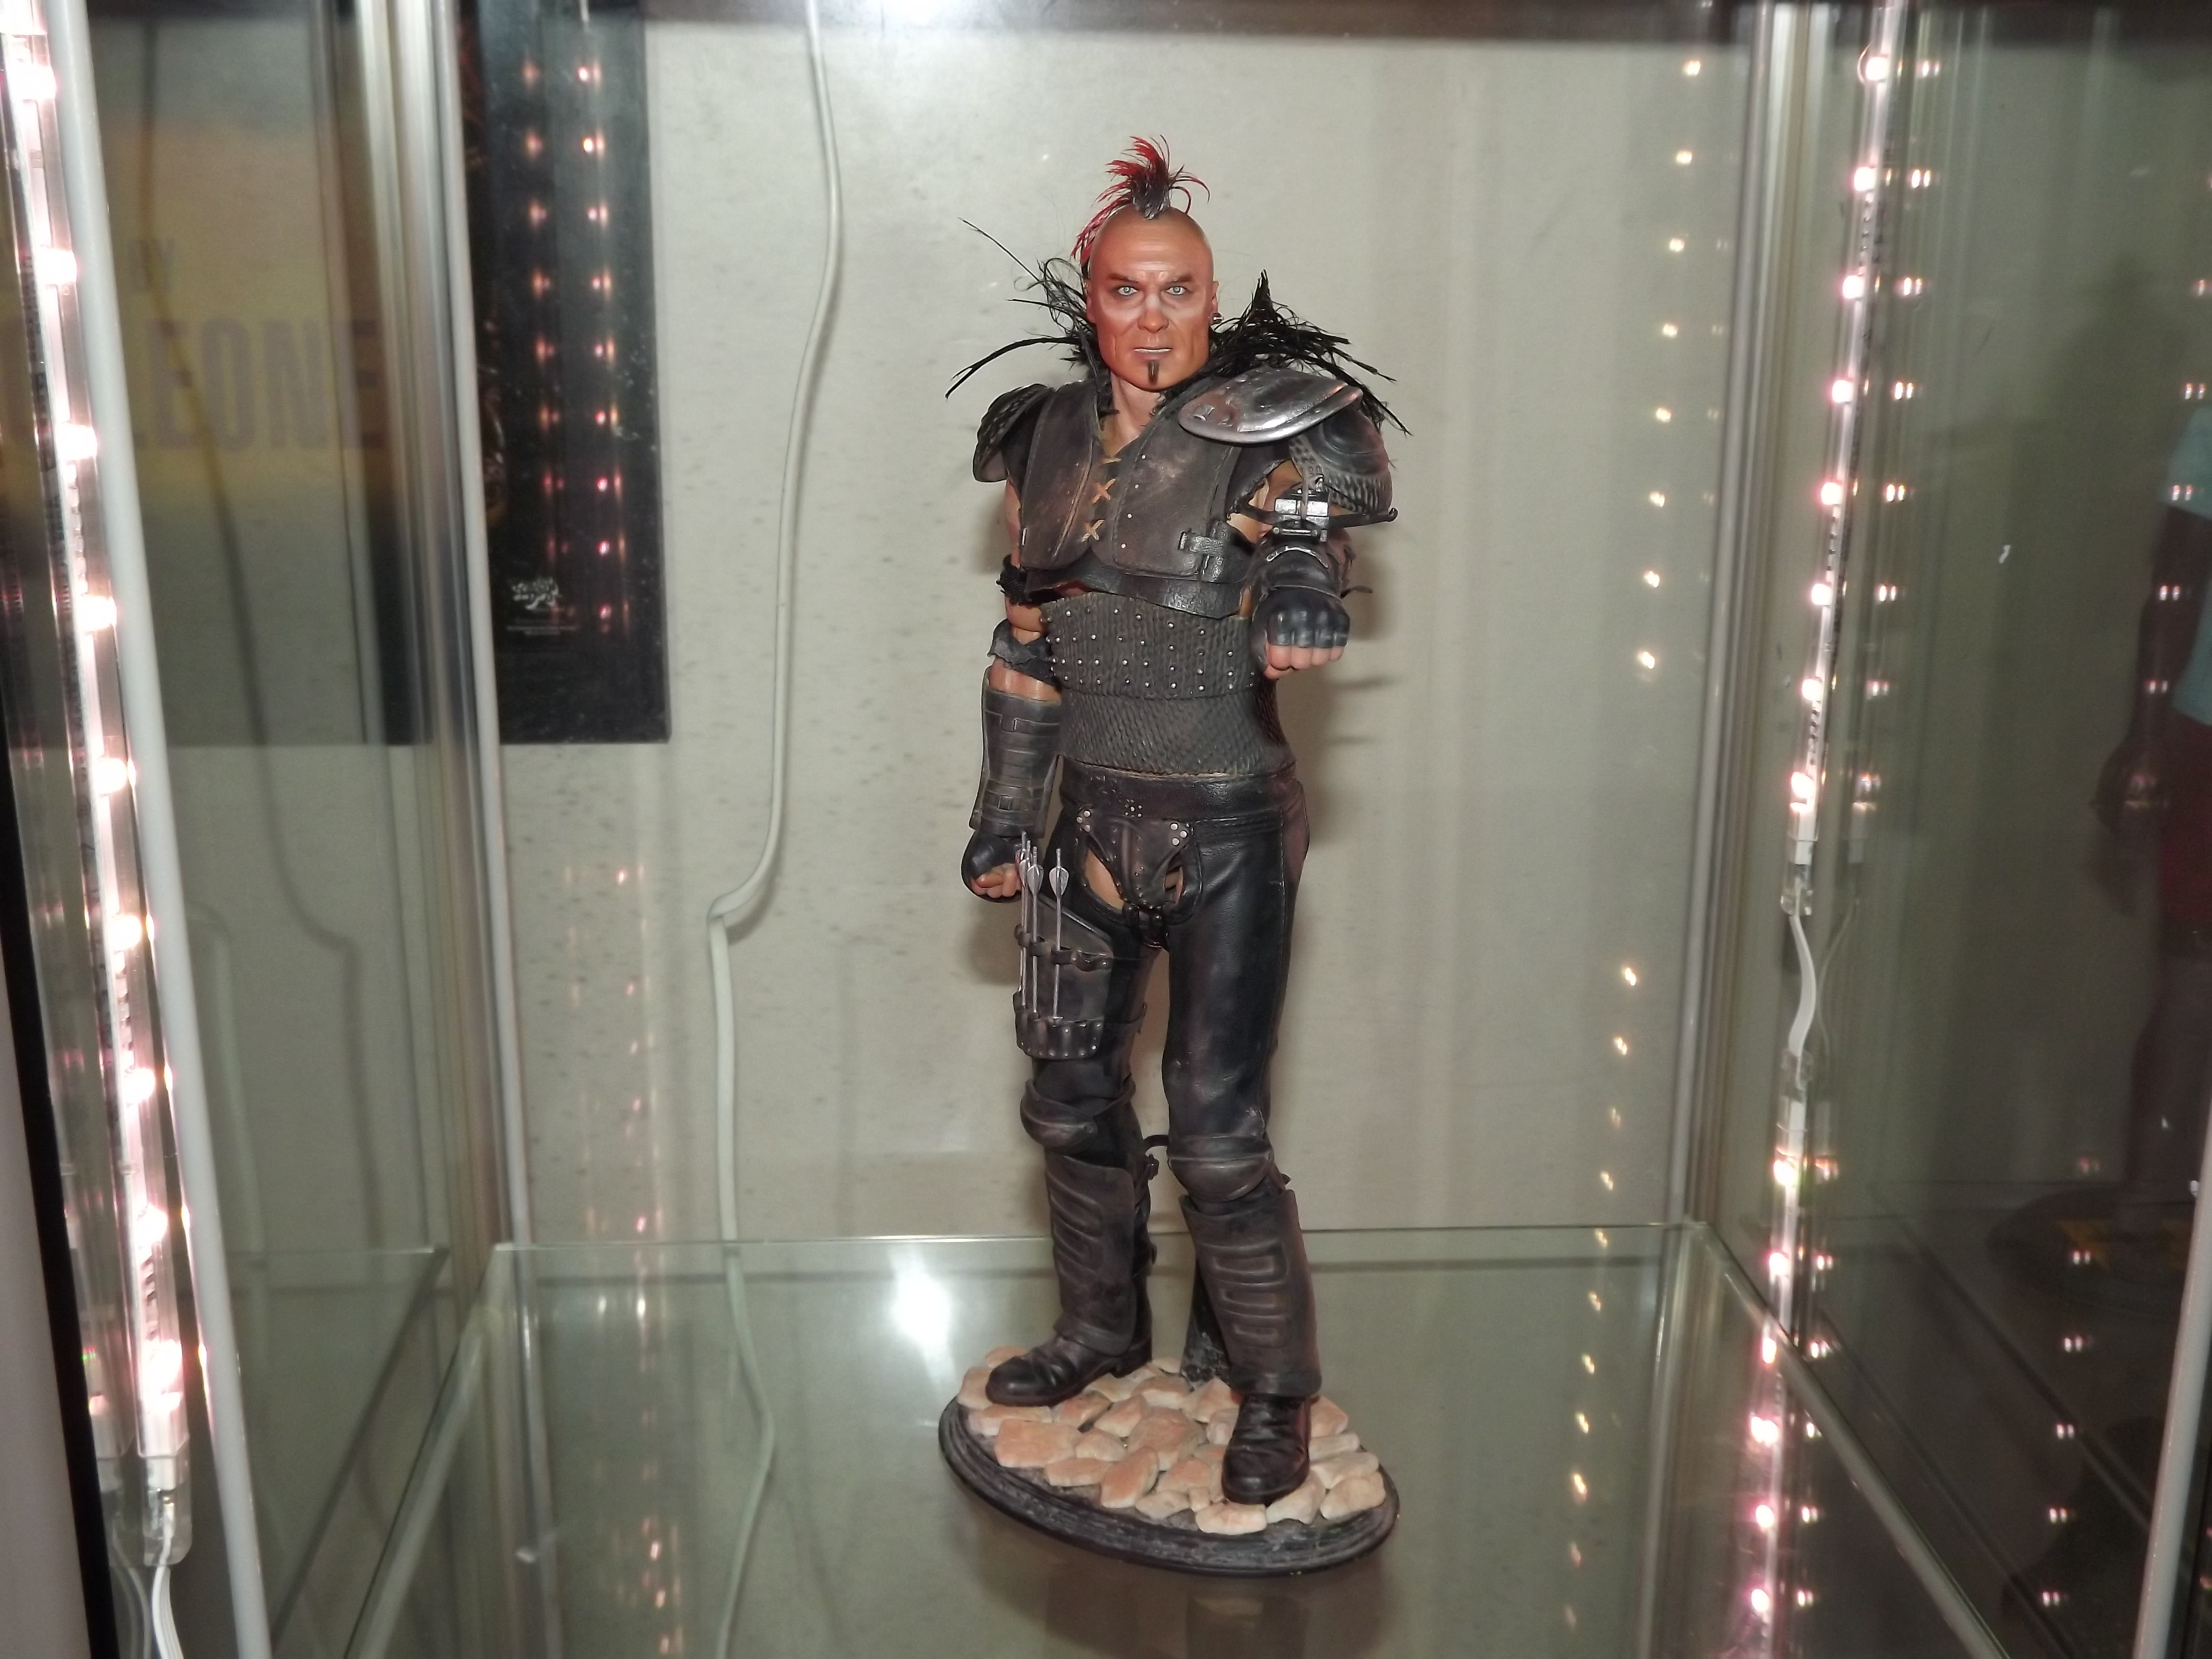
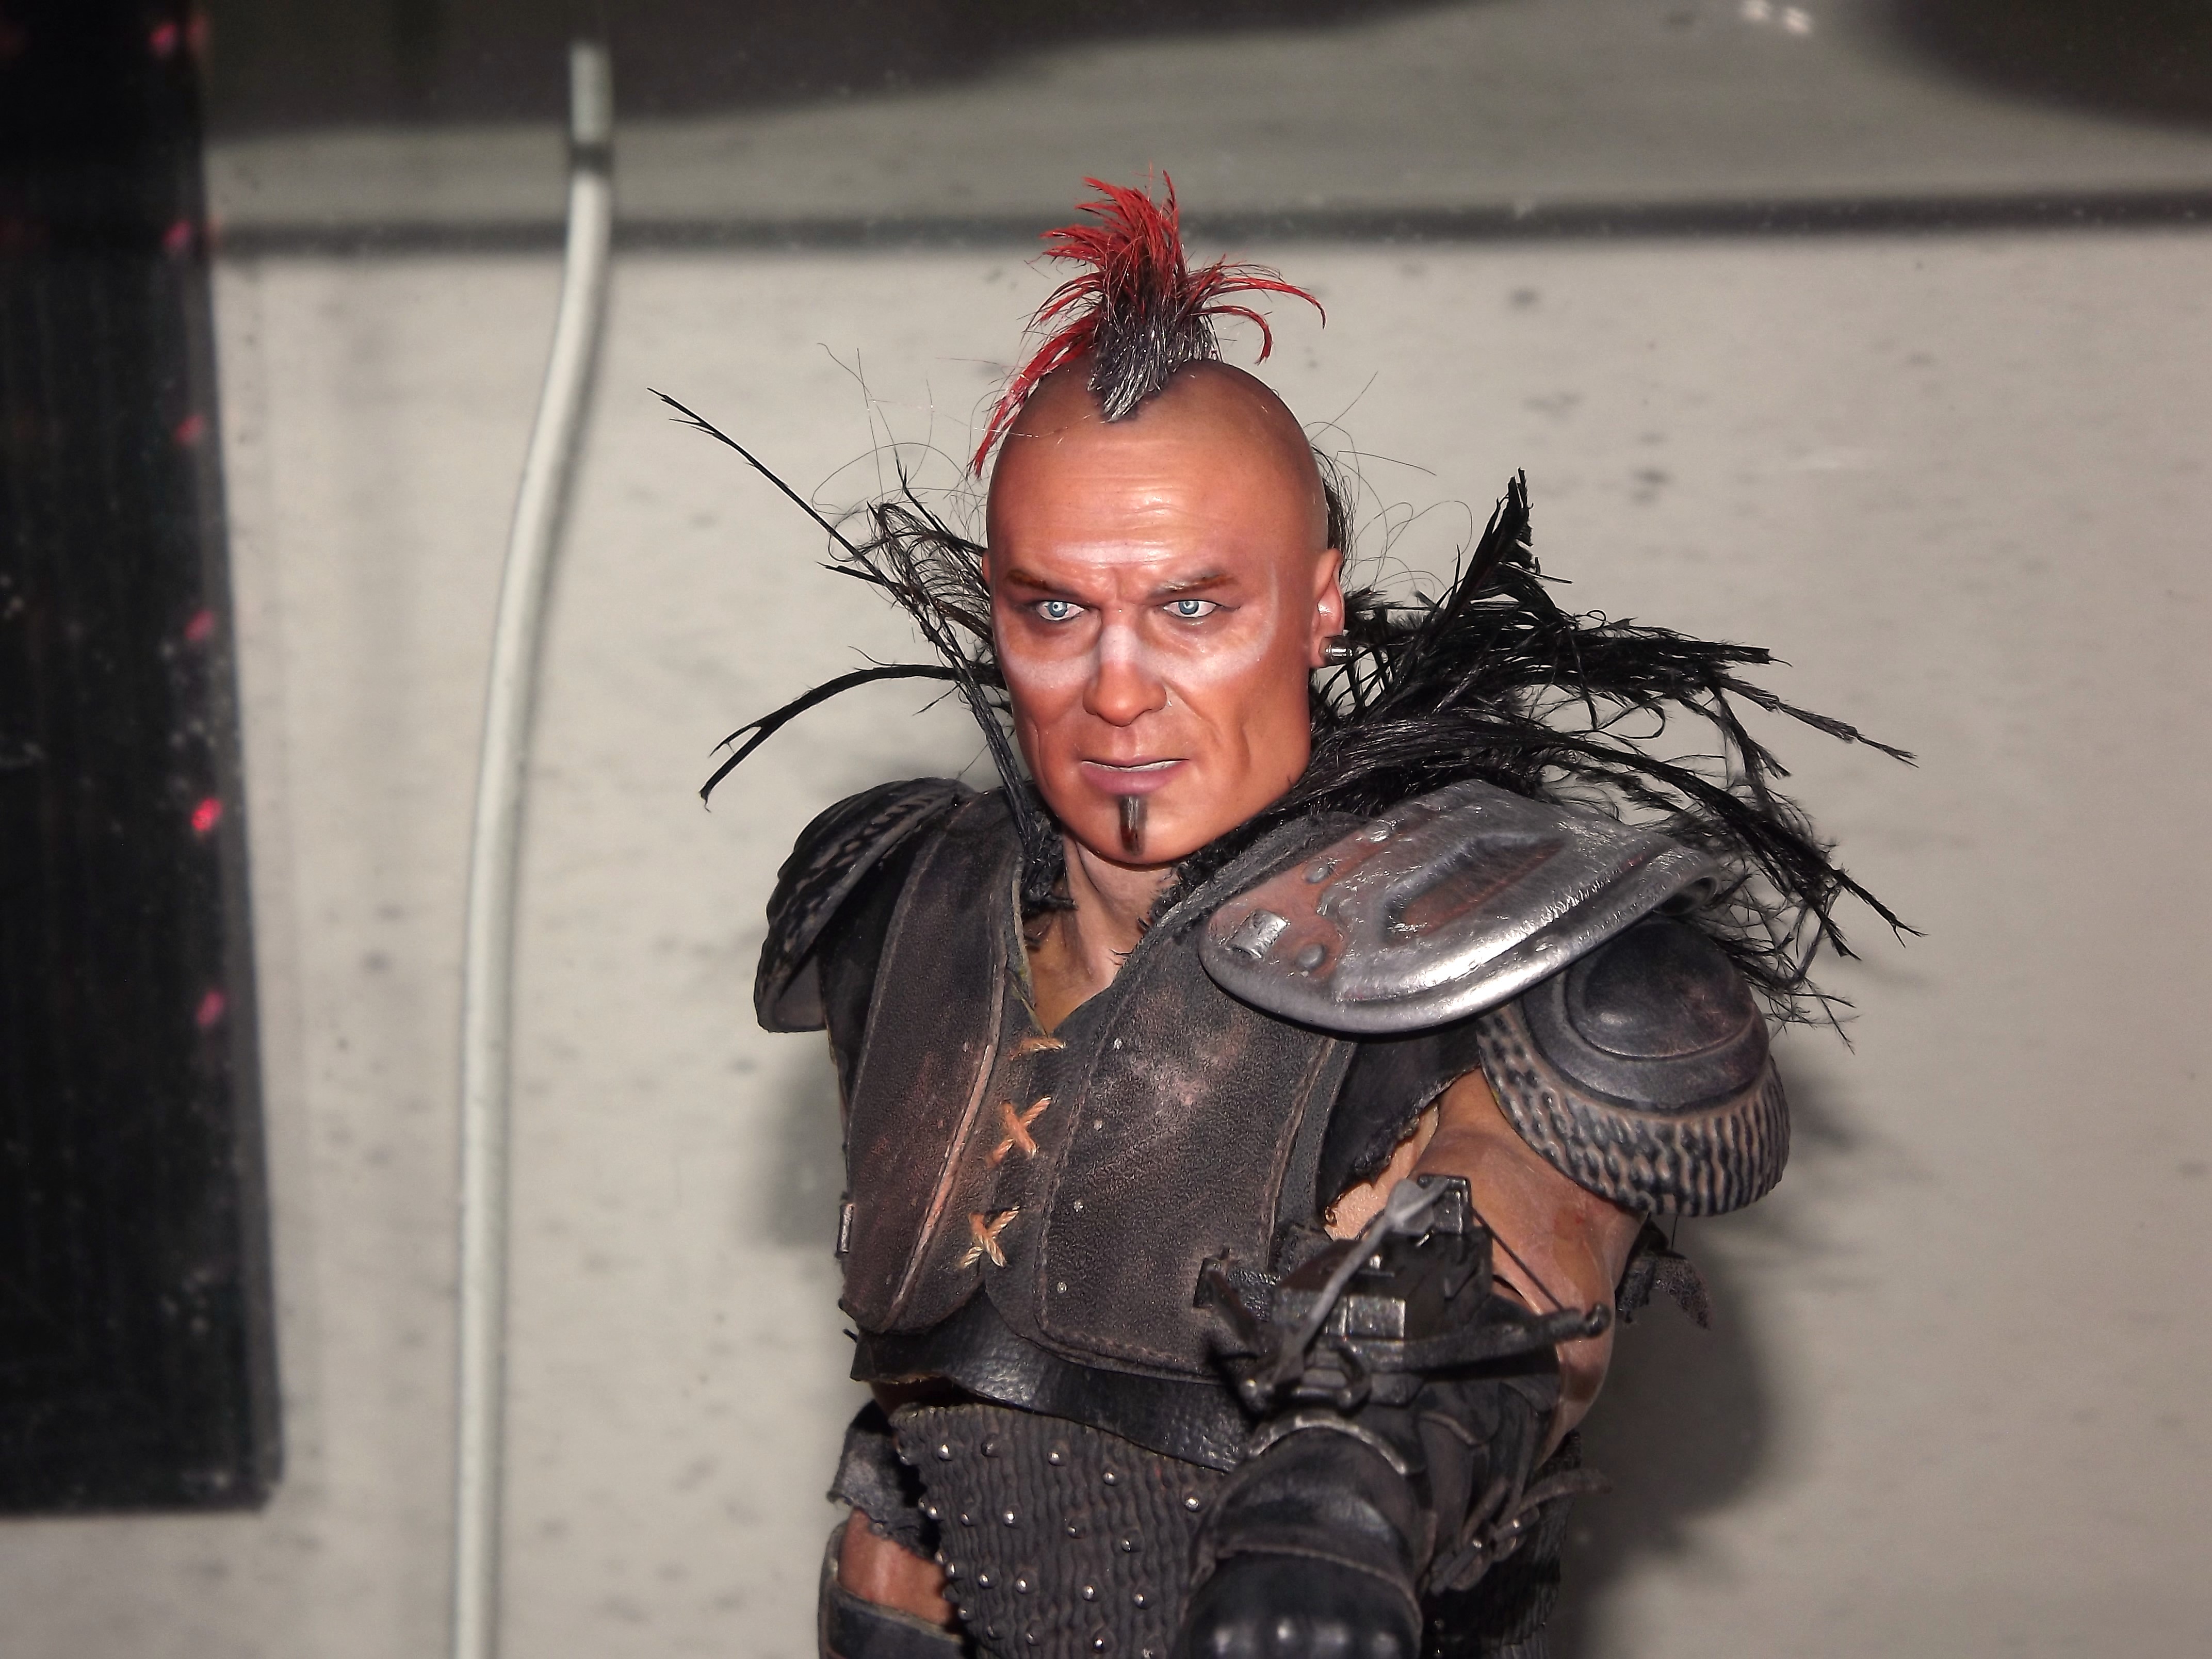
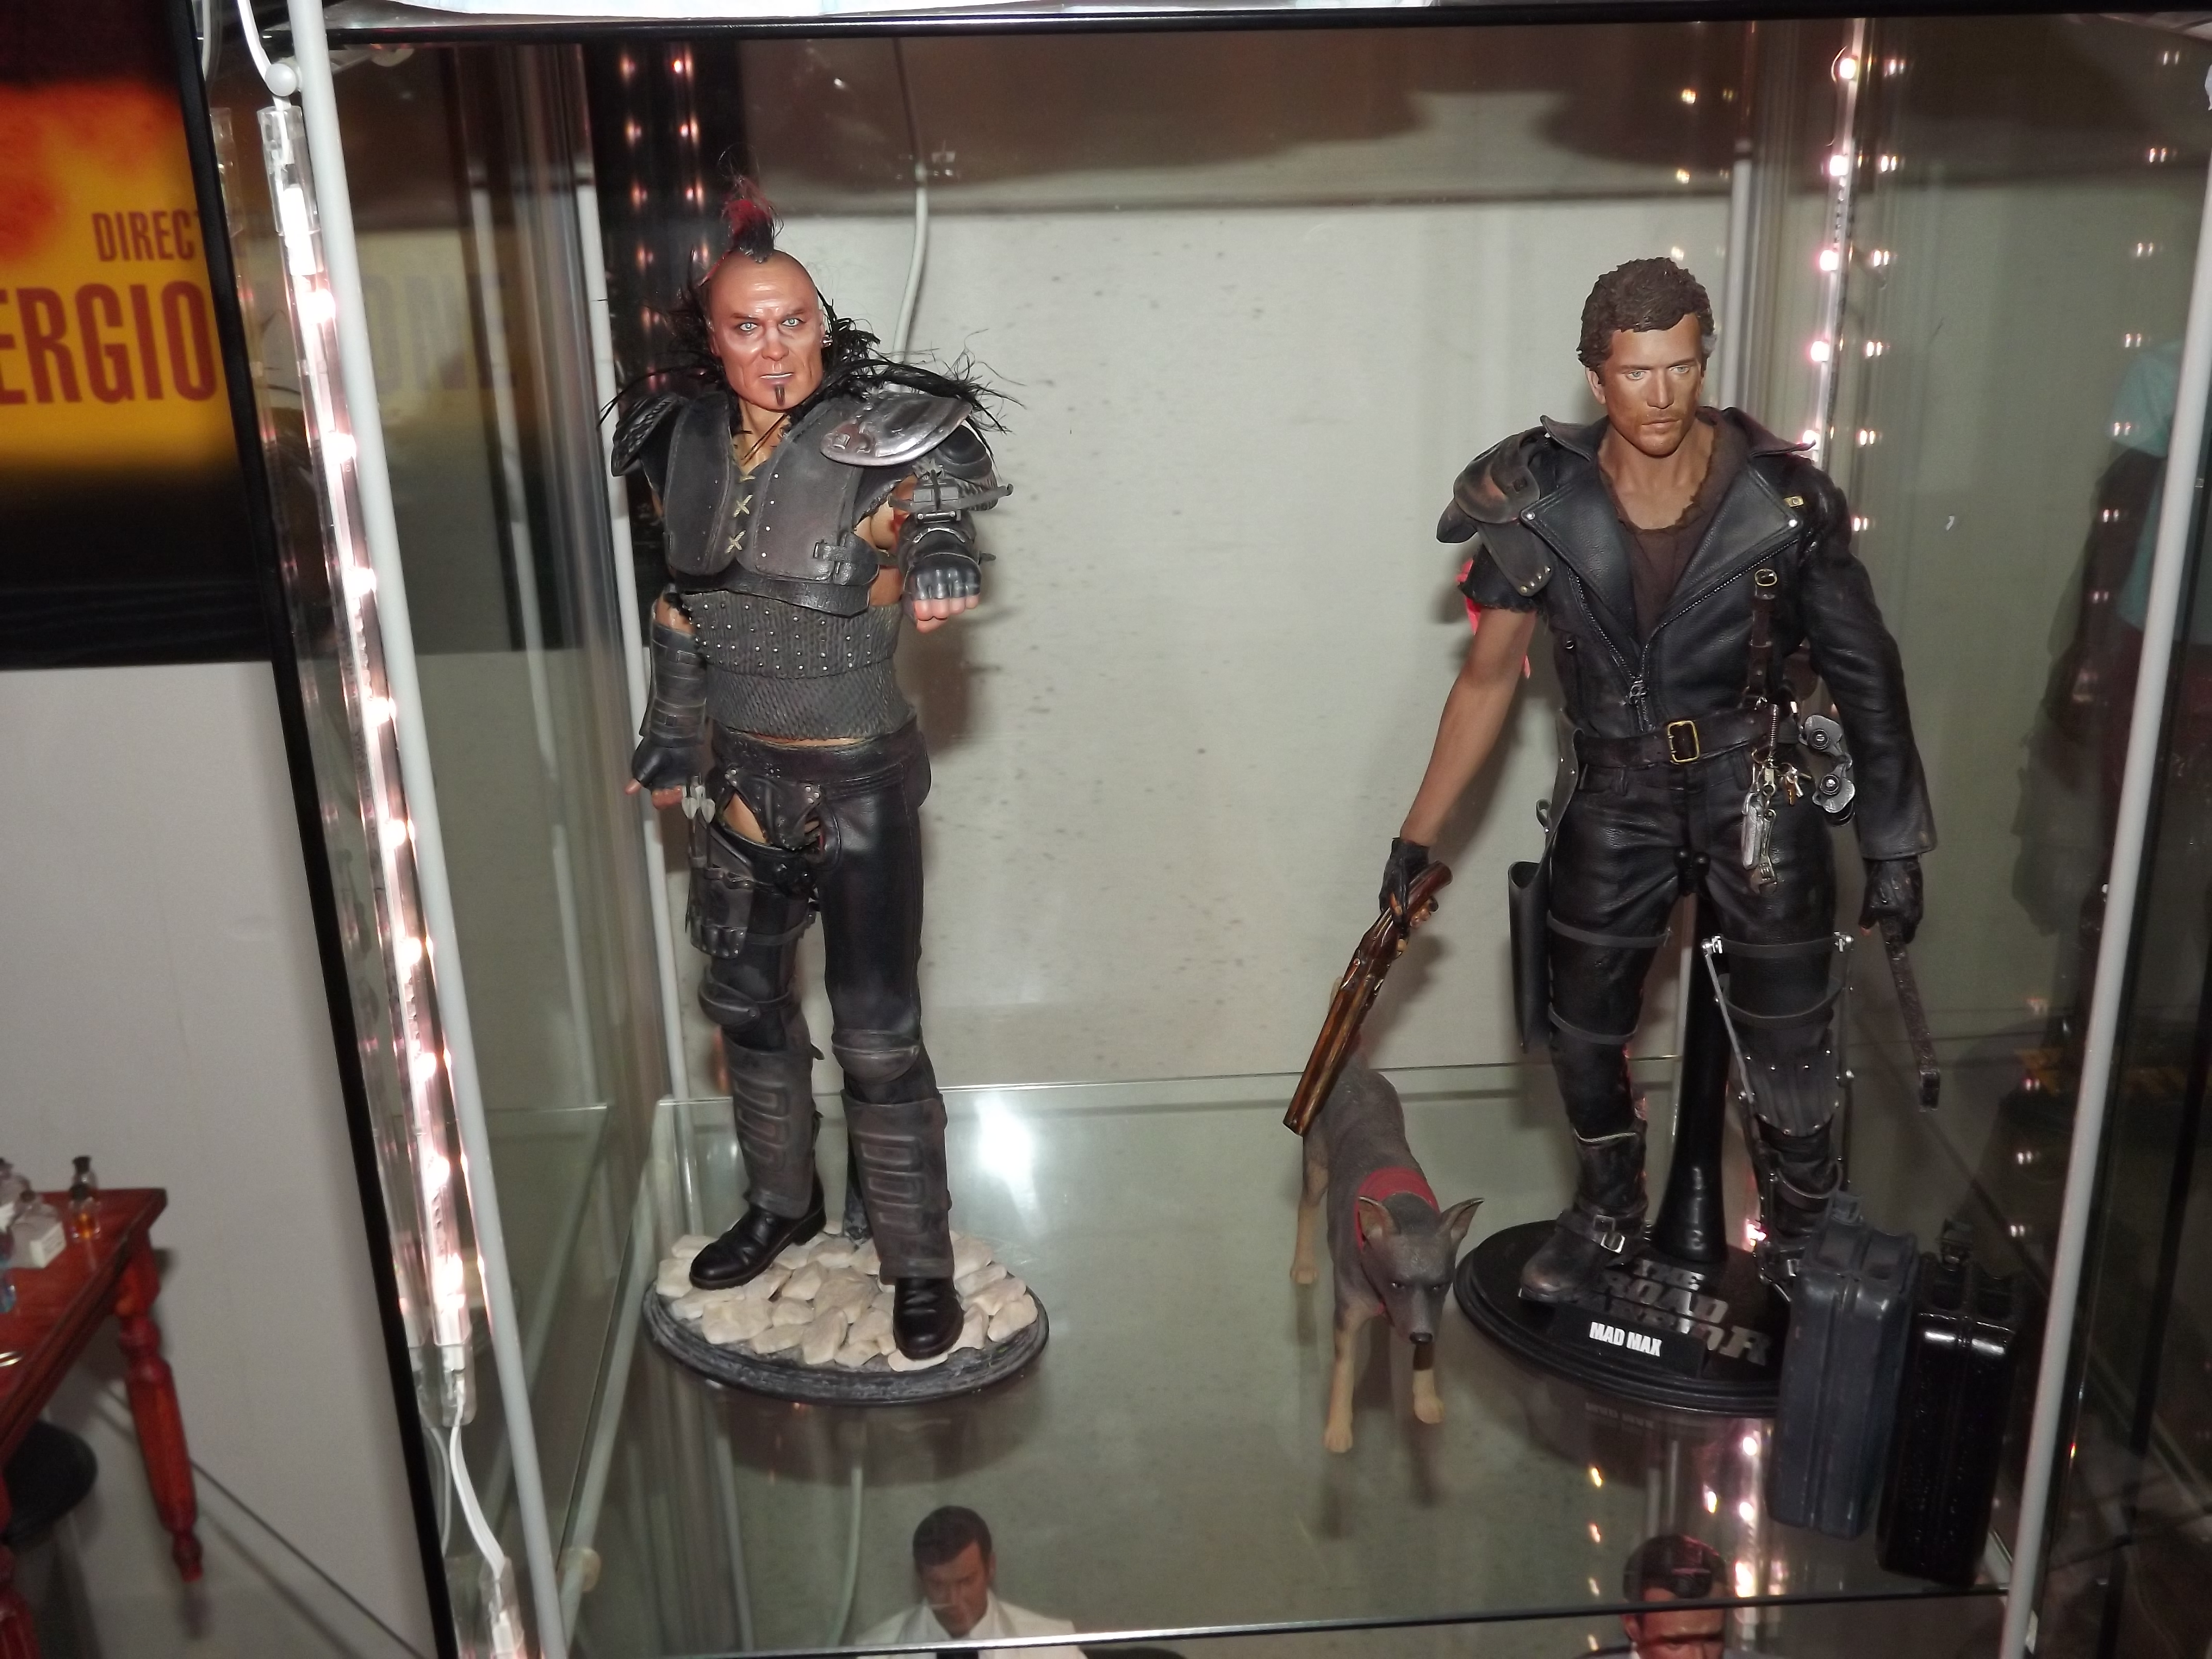
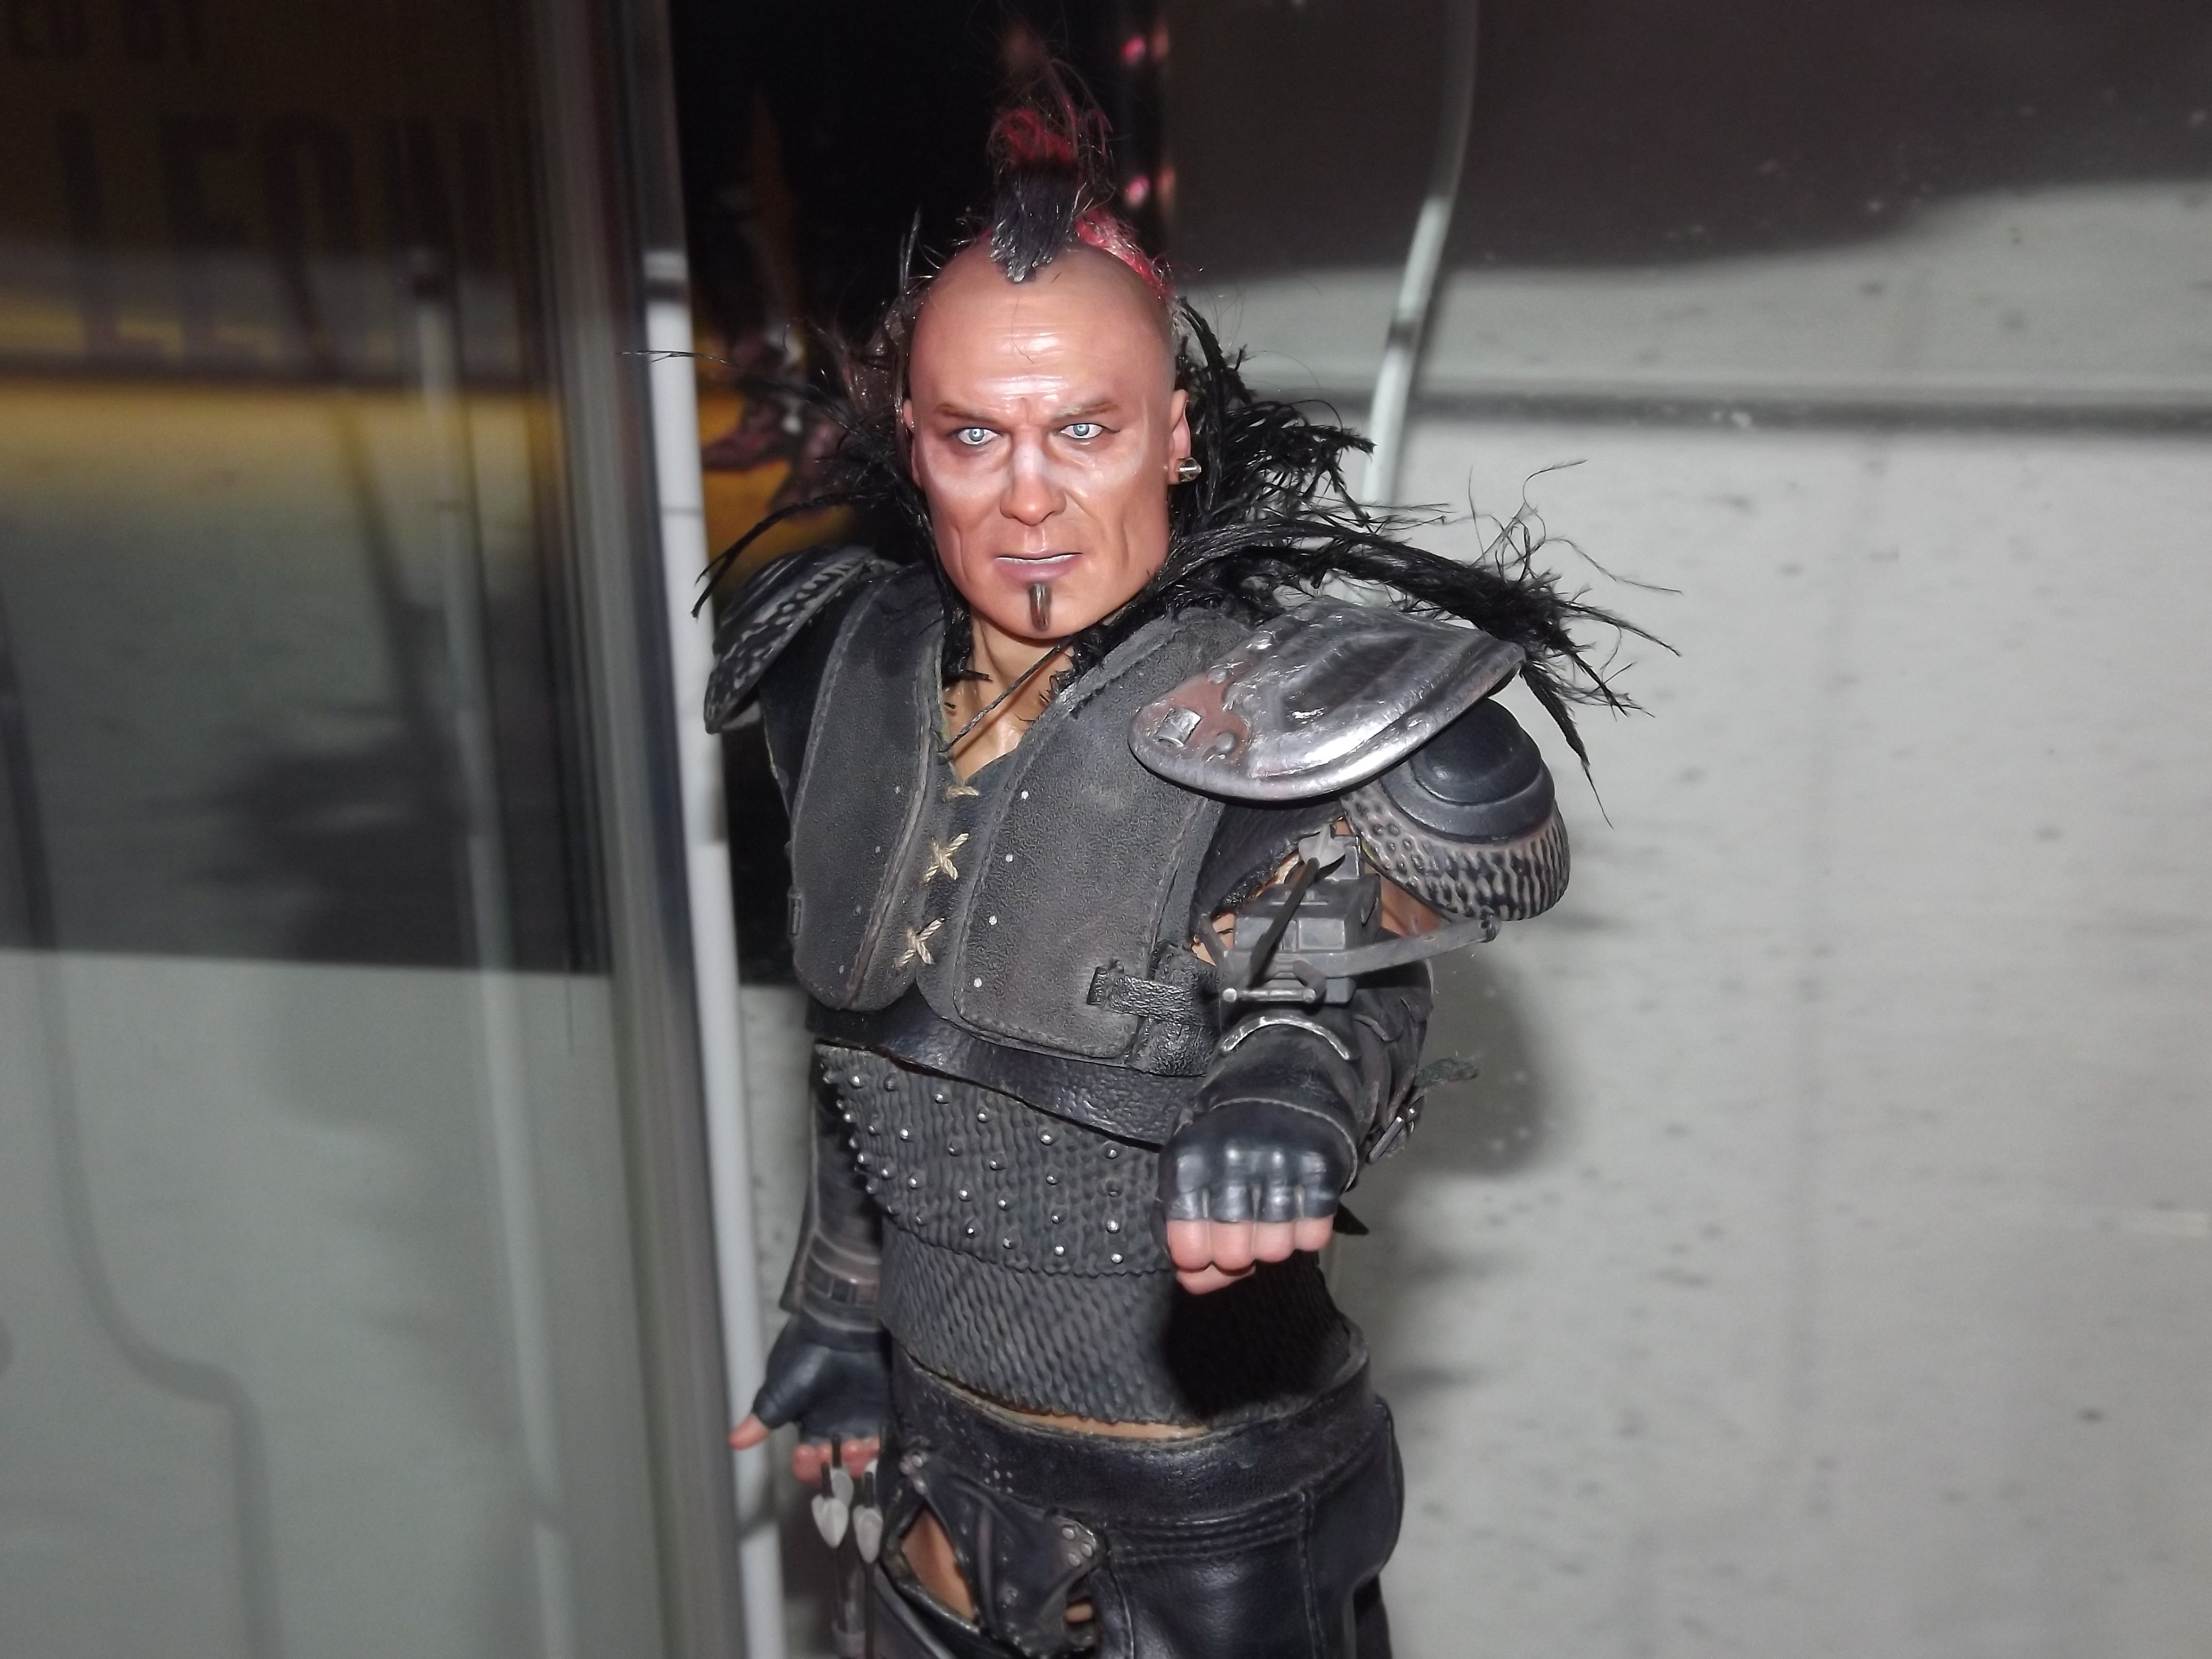
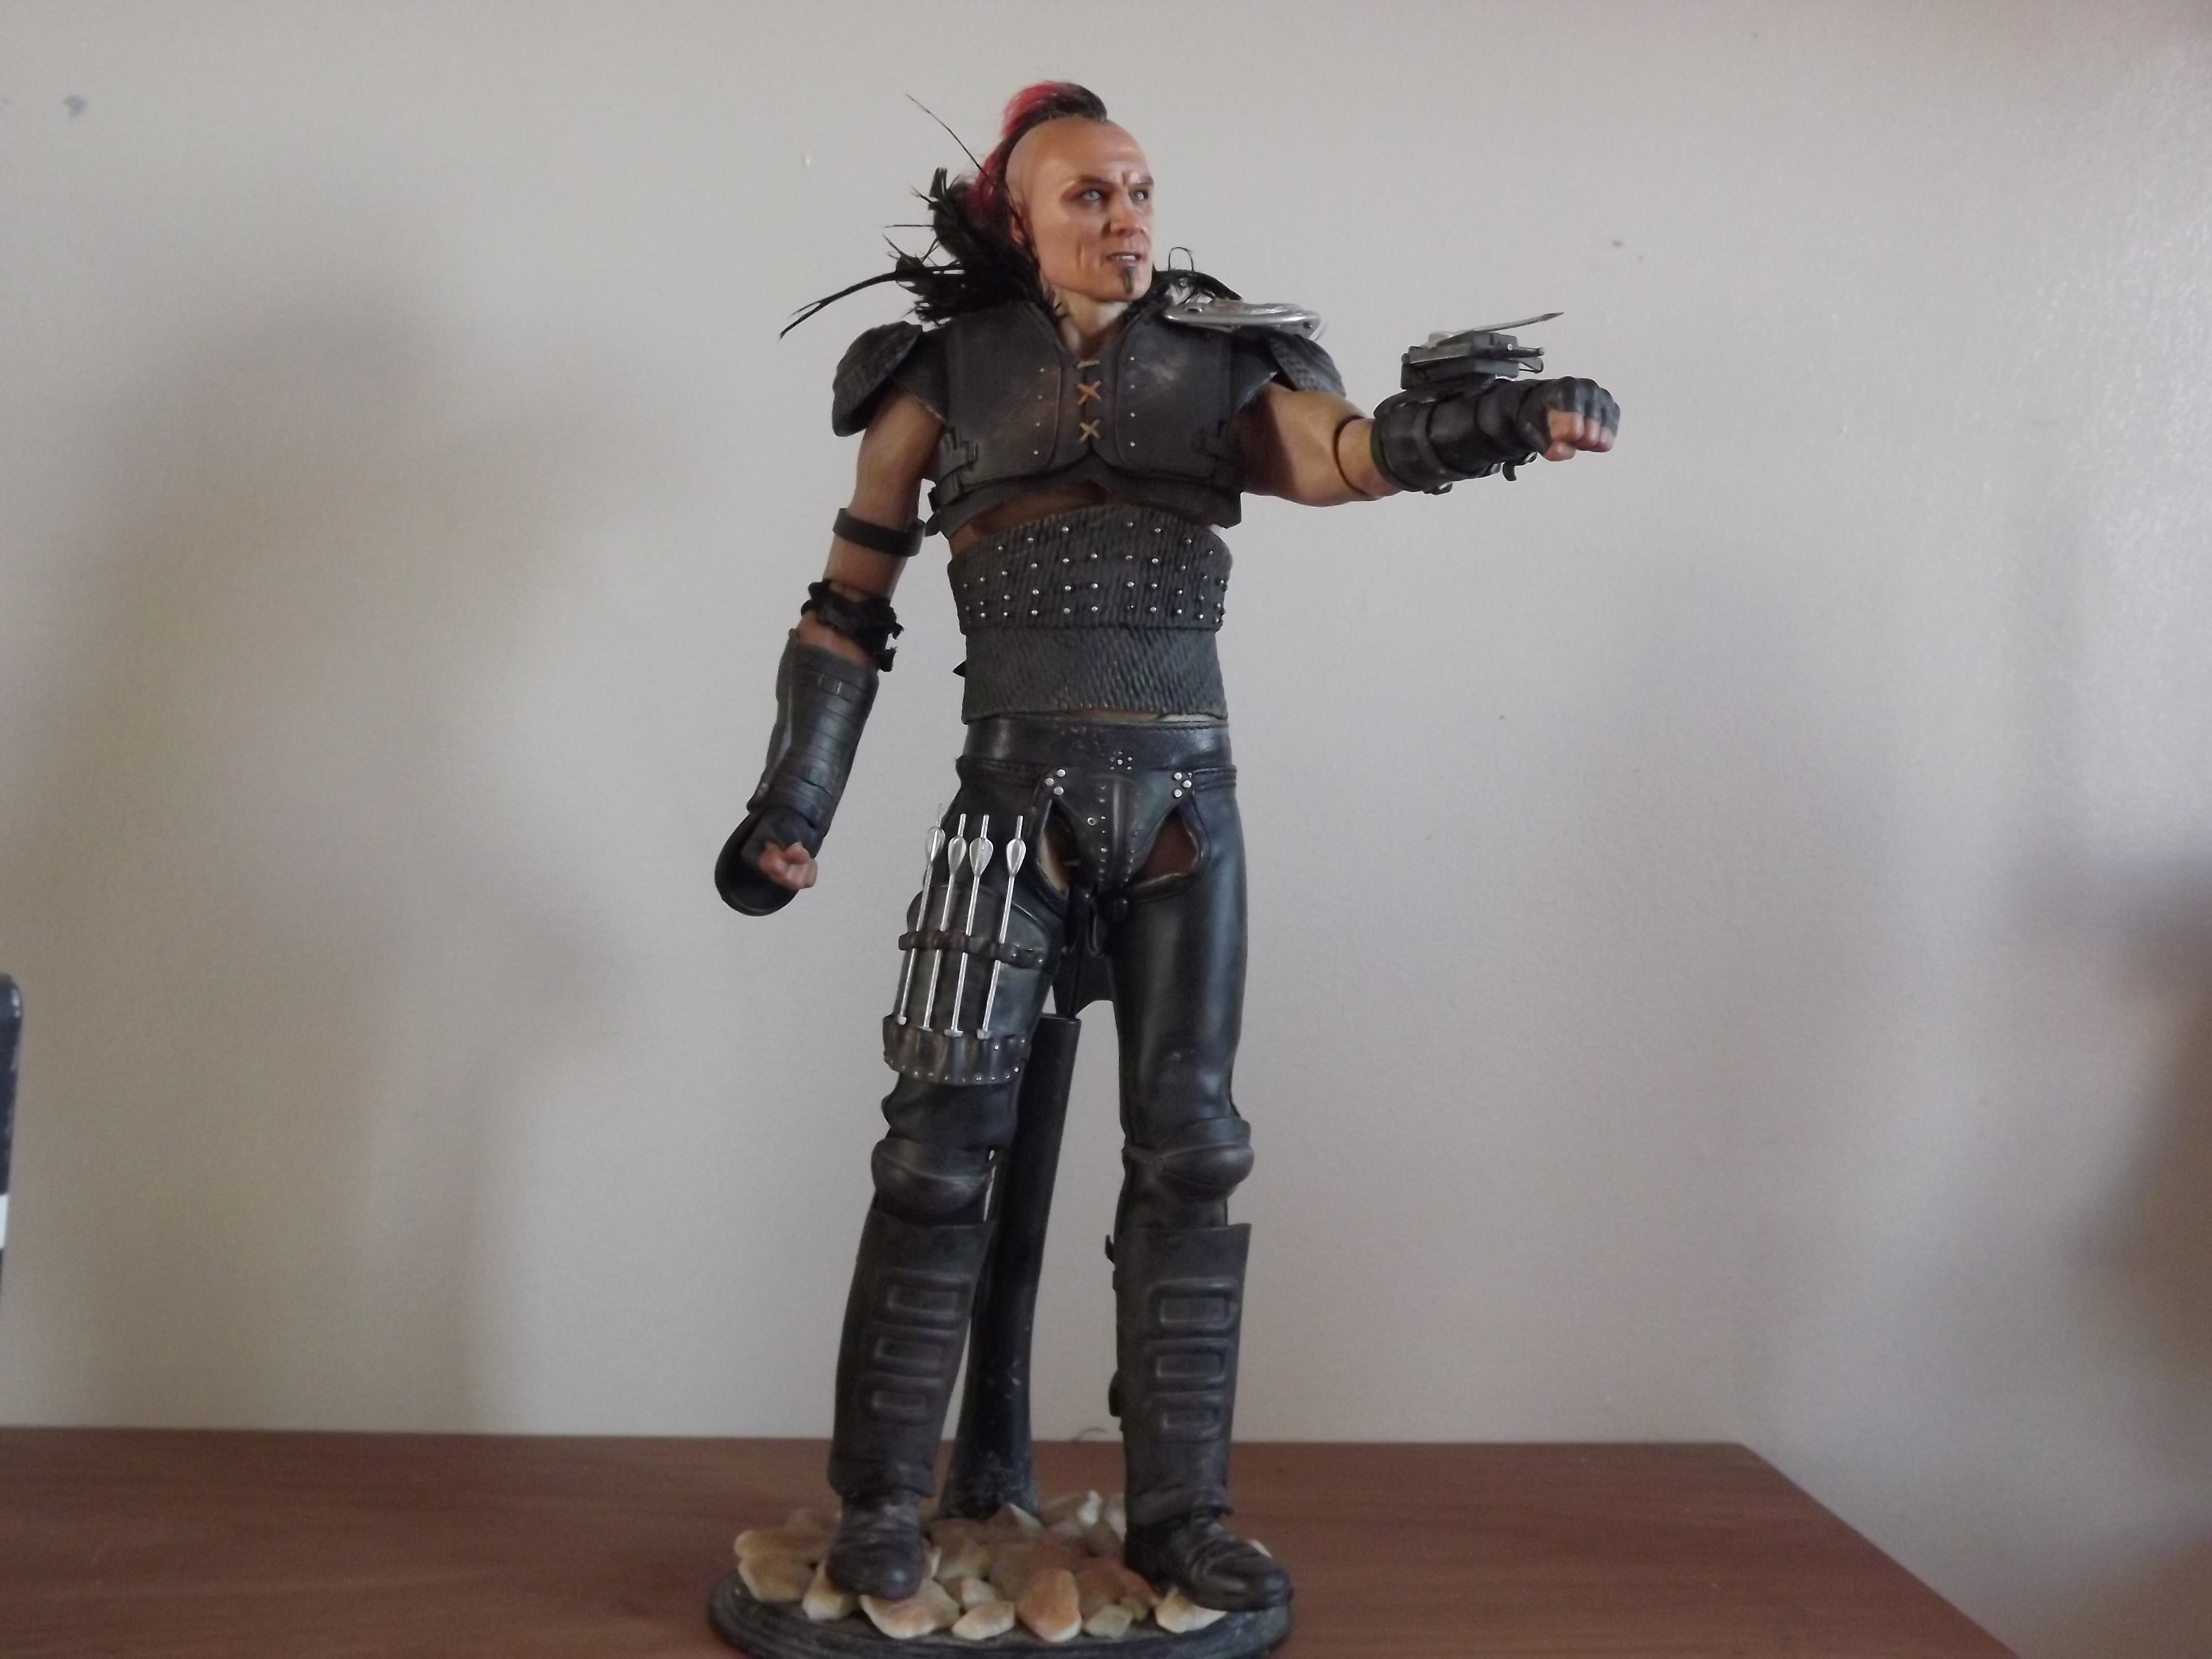
Got my shoulder pads all done bar the weathering painting. This was time consuming, but really happy with the end effect. This is how they looked before attaching the feather pieces. The puttying was all sanded and smoothed, then the self adhesive layer applied (needed to be tricky to get around the strap fittings). I got some pins and used them instead of the silver paint dots of the original. Cut the pins off them inside and then a couple of layers of tape to protect from any scratching. The ONLY thing I wish was that the exposed silver pad was just a little bigger.. if it was it would really complete the look.. still thinking about whether I can make it bigger or just make peace with it.

There are some rough seams around the tops of the shoulders I very nearly wasted my time on cleaning up before I realised the feathers cover them entirely, so that saved some time.
For making the feather boas, my initial plan was too bulky so I opted for another recipe which I think looks very decent. It's not exactly the same pattern as the boas on the actual costume, but the effect is close enough to be convincing for me. If anyone wants to do this, it's not hard, but a bit fiddly and time consuming. There may be other options for doing this for better effect, but this is very serviceable and very doable.
First, get some real feathers. I got pack of 100 off eBay for little money being sold for weddings/parties or some other nonsense. They had a lot of different colours but the black ones were what we needed of course. The technique then involves getting some water based sealer or gloss varnis or something similar and pinching the feathers between your fingers to get this kind of scenario:

This is like making mini feathers from big ones. Once dried you then cut along the edges to separate the fronds from the middle stem. Another thing you'll see is it the end points of the feathers make for cleaner shapes, these points need to be cut off and kept separate from the side fronds. Now, I'm not sure how many you need to do, I did probably 60 of the pack of approximately 100 by the end of all this and had a fair few spares, as well as the extra waste from trimming up the 'boas' to the right size once I got them on. Honestly, this is not a lot of work and you can do batches of 20 or so pretty quickly.
Next you'll need a thin piece of fabric, rough 5mm by 6cm, ideally black tshirt material. Then you'll need a round surface, I found a small paint bottles ideal, but probably anything like a 3cm diameter at the base or so. You want to get a curve close to how they'll go on the shoulders. Use two pieces of double sided tape to tape the fabric around the base of whatever round thing your using and then begin applying the fronds (not the points) to the fabric by placing a line of FabriTac or similar along and then pressing them on as on layer. Once they're all on and the glue's grabbed you can roll it around on a hard surface to make sure they stick down good and proper. I'm really not sure how many times you need to repeat this process, but I think about 6 layers worked for me. The fronds will go on flat and adhere very strongly with the FabriTac, just make sure it's dried inbetween each layer to prevent any weak points. Sorry I didn't get any shots at this stage but the one below covers a lot of how this should set up and look.
After 5 or 6 layers of the fronds you then need do a neat layer of the points as a top layer. This is the main one you see so it needs to be the most 'feathery' looking.
Once you glue the top layer in I carefully put a rubber band around it to hold it nice and tight while it fully dried over an hour or so.

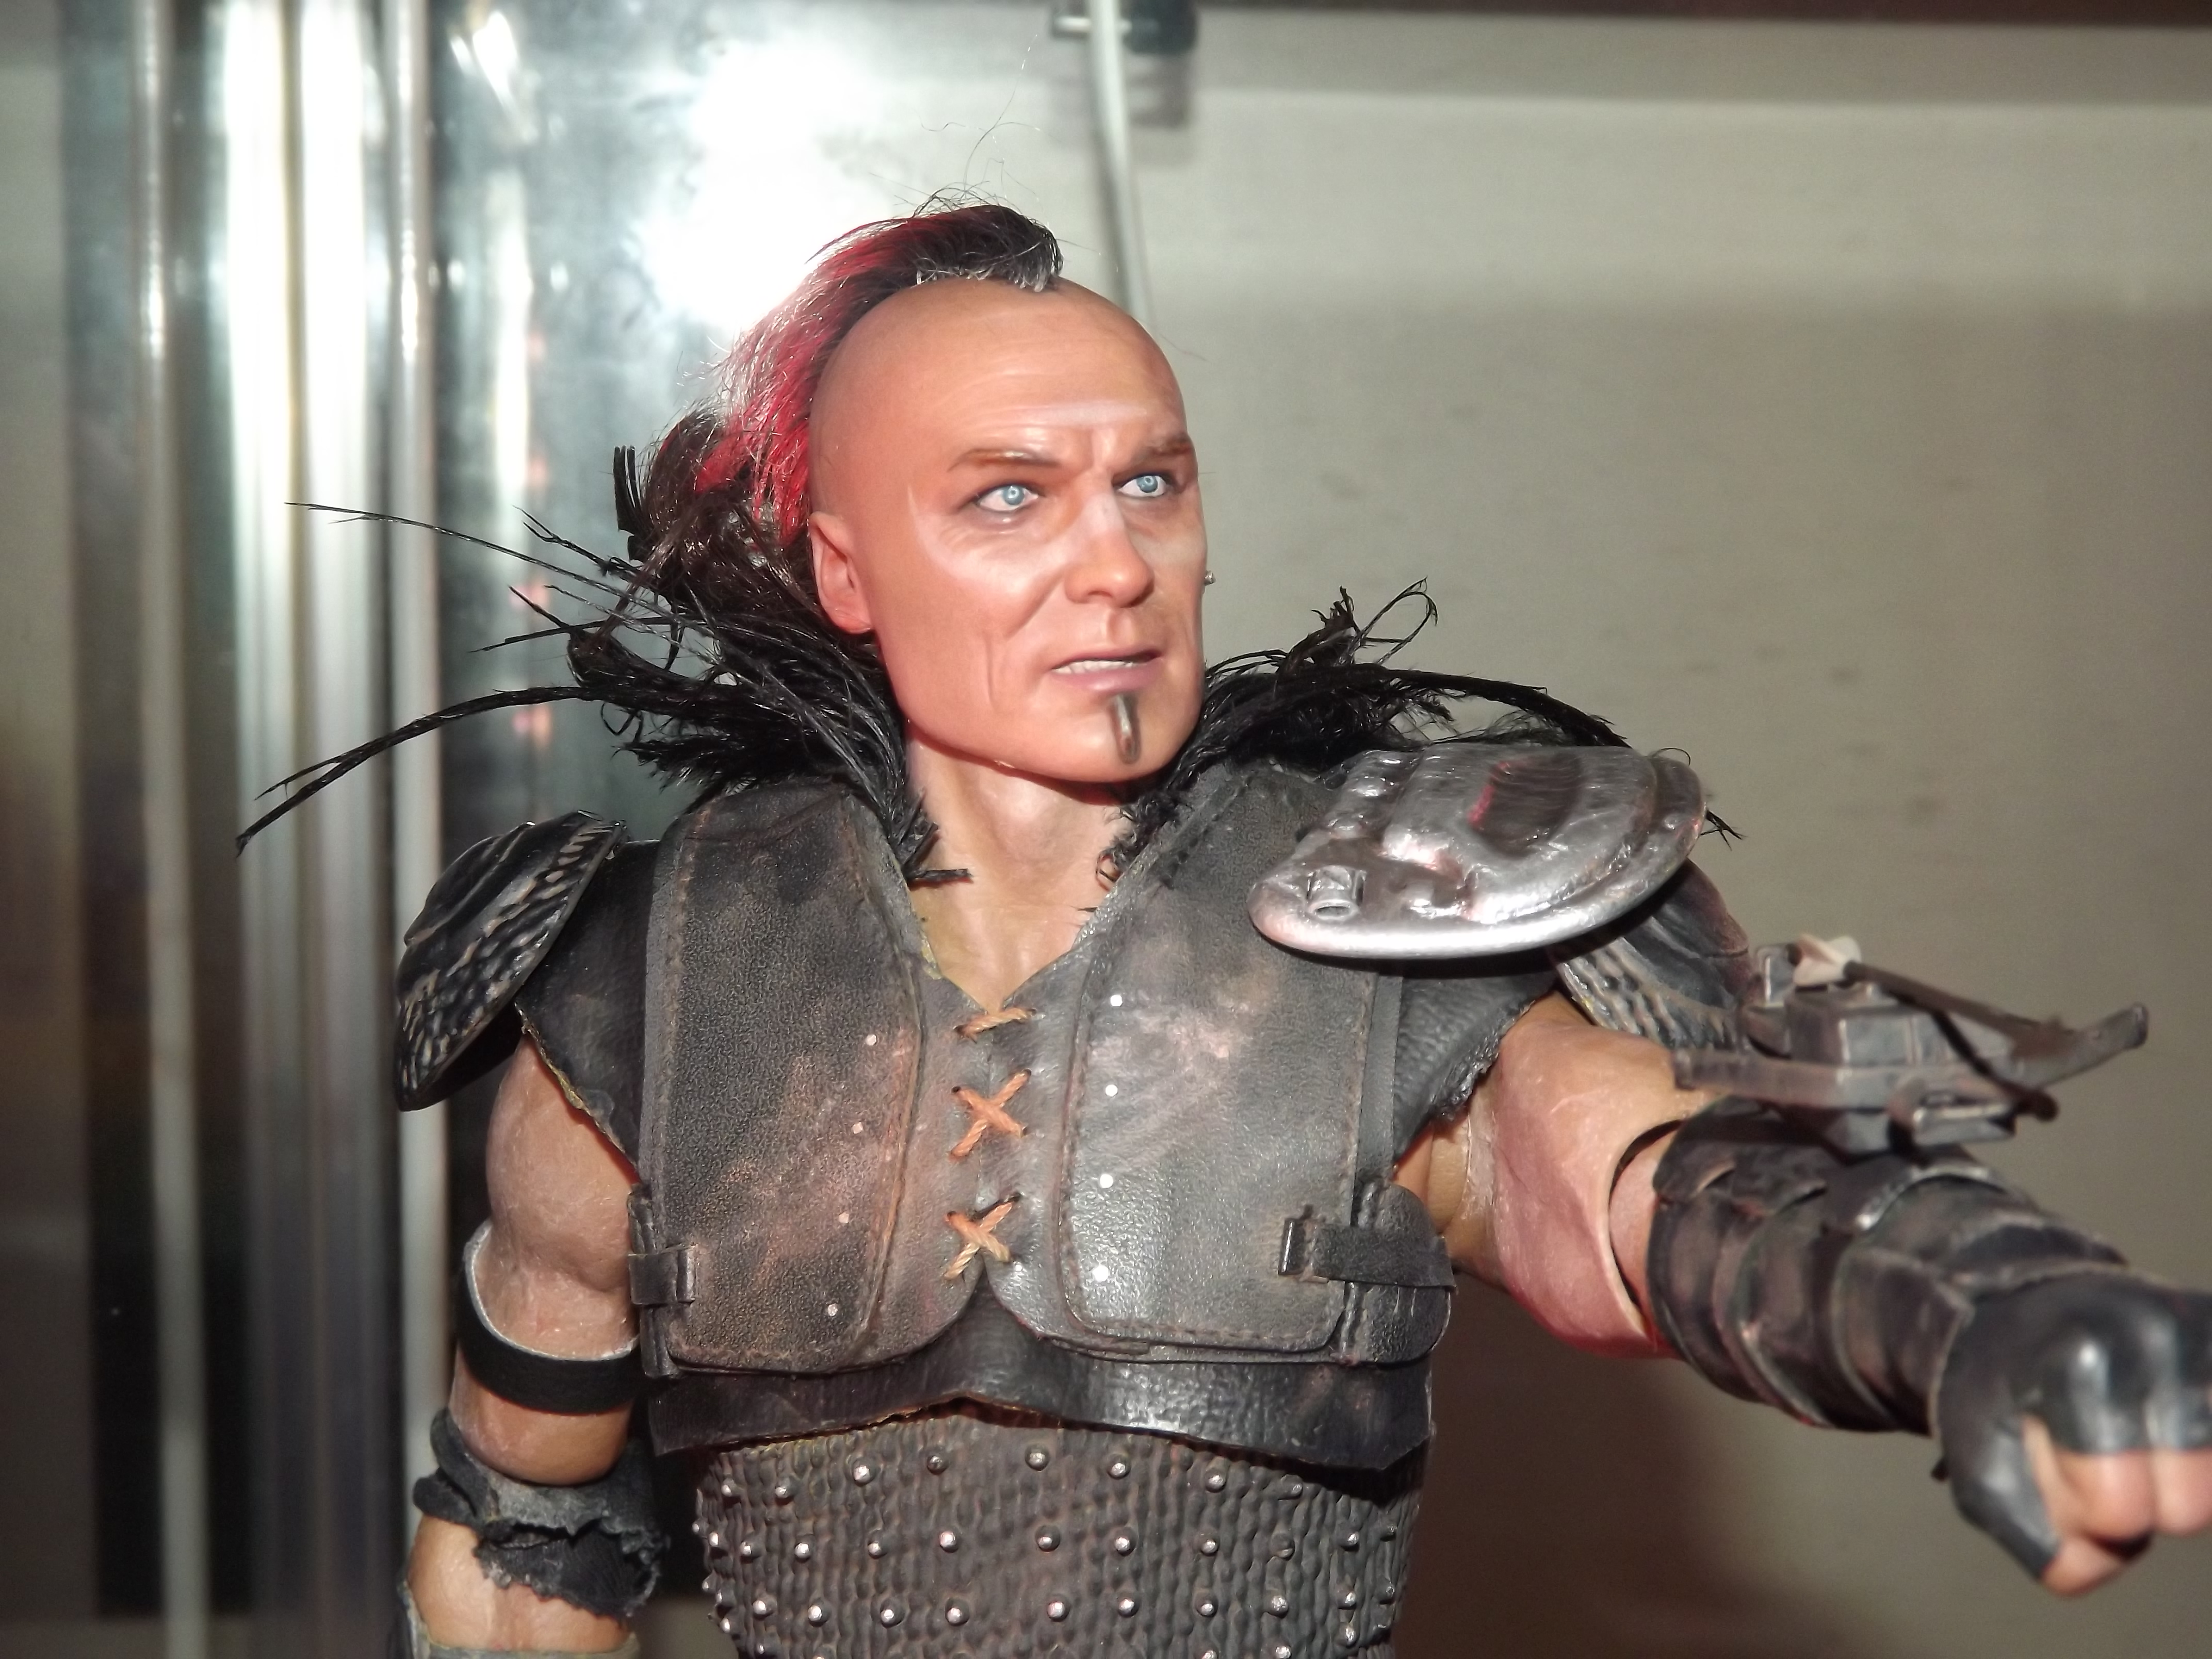
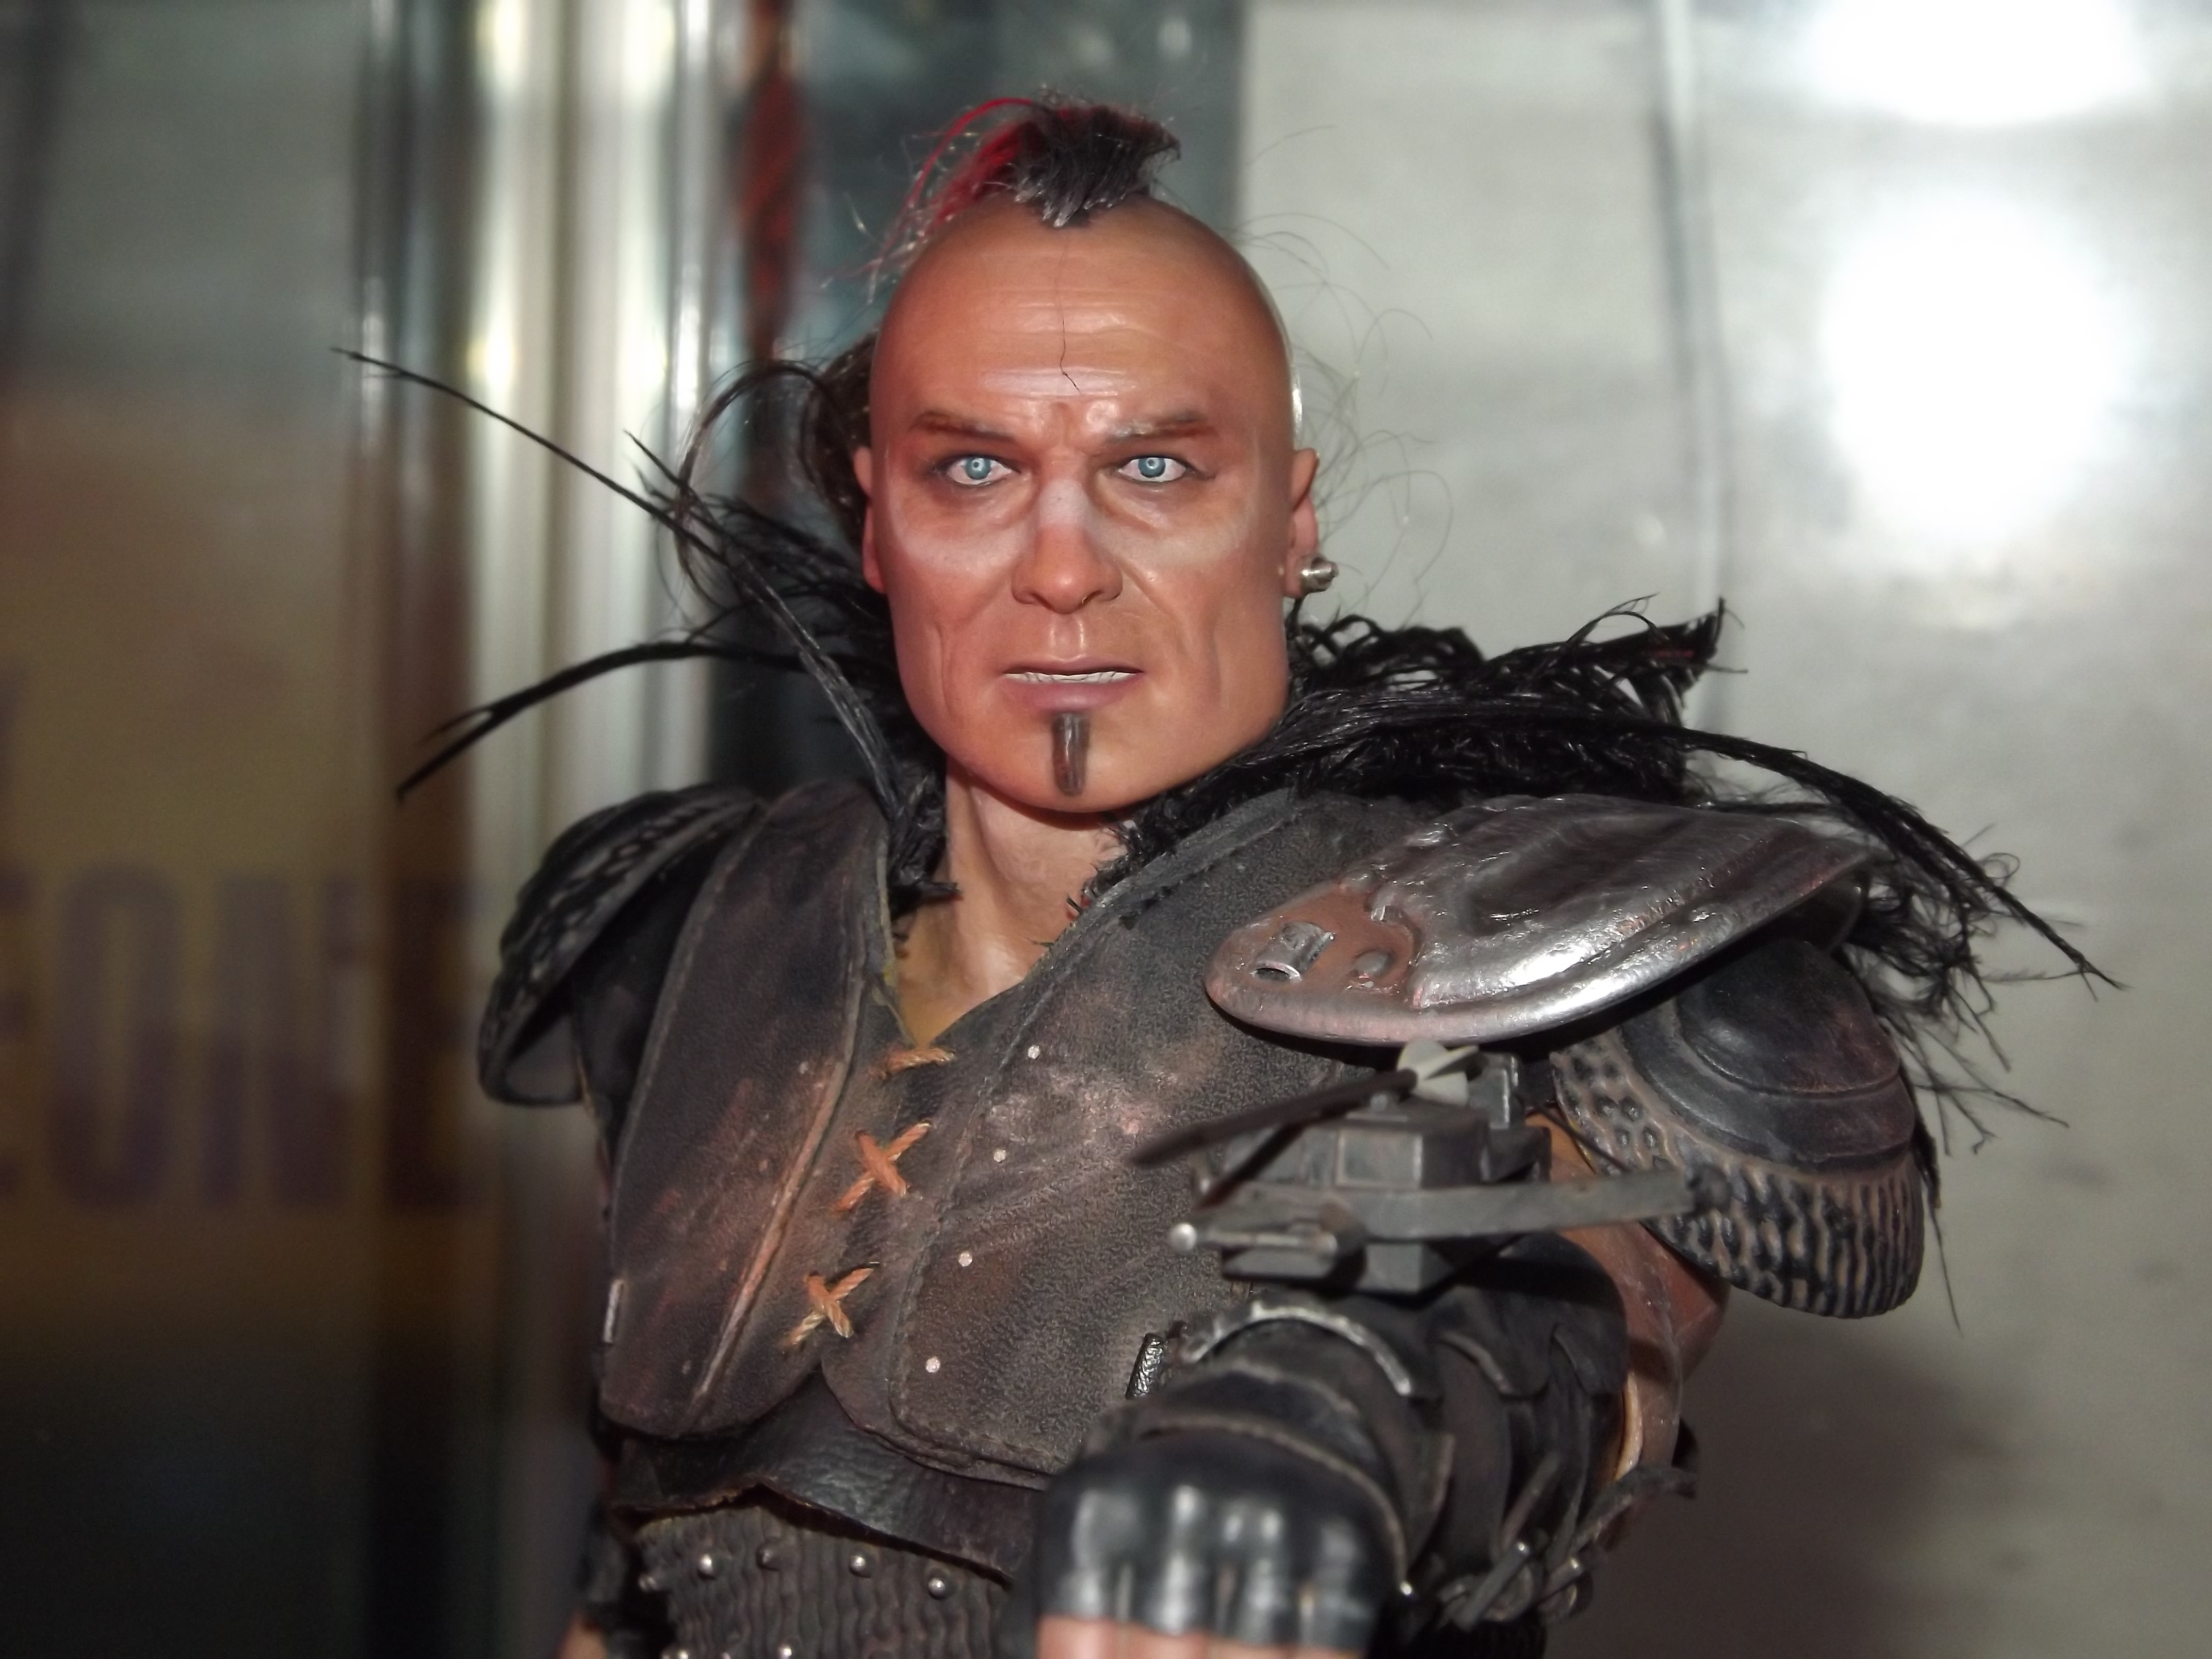
The magic of this method is you end up with a lot of feathers without a lot of the bulk that hurts the scale. The layer of the points on top gives a really nice neat line to them. You can then carefully take the feather piece off the tube you used. The FabriTac should give a nice solid feel. After you have done two that are much the same you then need to work out which side works best for each one and then start trimming the excess feathers and also cutting the other side of the piece to get a nice clean line along the inside. You should be able to trim all the way back to the fabric layer, but you'll also need to shape them a bit so they can sit correctly on the shoulder pads. You just want to keep trimming and test fitting until your happy. The feathers themselves can be trimmed a bit more evenly once you put them in place too, always better to err on the side of caution so you don't cut them back too hard, though.
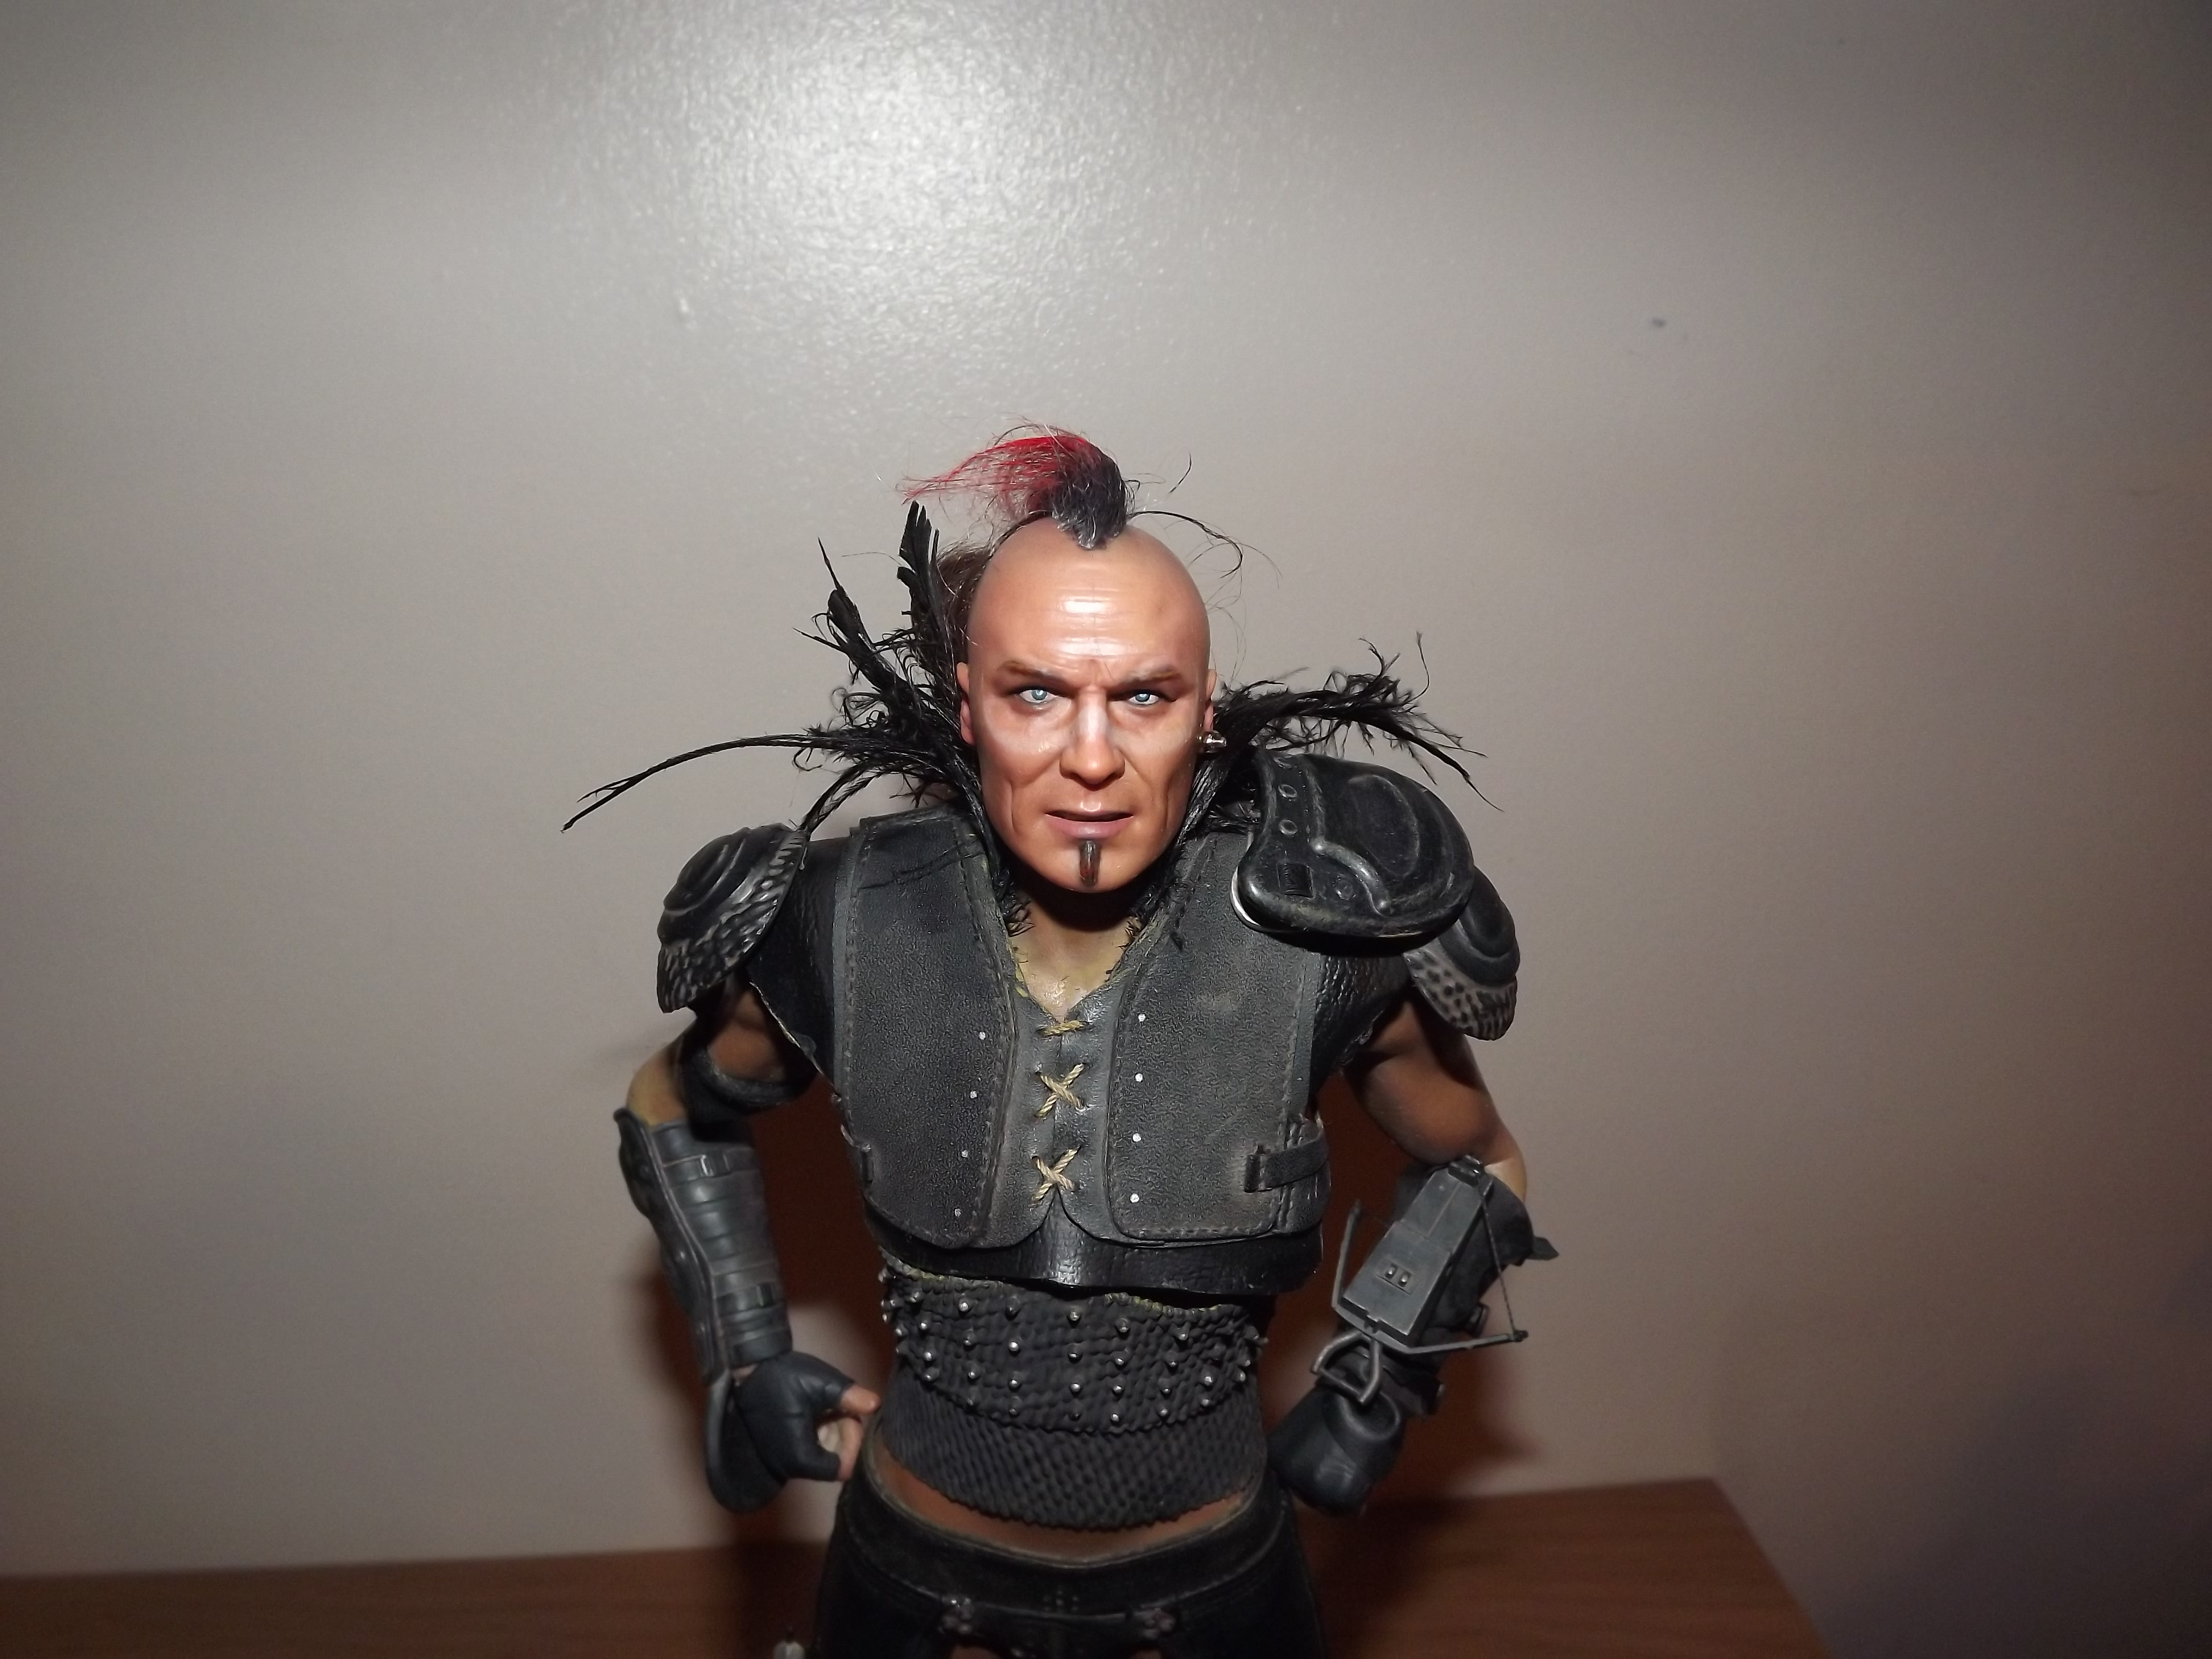
And the end result is pretty decent!!

I only have them on with double side tape at this stage. Once everything else is finalised I'll then hot glue them into position permanently.
If takes a bit of time, but even if you don't want to do the full shoulder pad extension you can still come up with some feather boas that scale pretty well in not much time once you have all the bits you need.
I've still got some painting to do and then making the crossbow more accurate before I'm done, but very happy with the progress so far. If I've missed any steps here or your not sure about anything just ask, only too happy to help anyone who wants to do the same.
There are some rough seams around the tops of the shoulders I very nearly wasted my time on cleaning up before I realised the feathers cover them entirely, so that saved some time.
For making the feather boas, my initial plan was too bulky so I opted for another recipe which I think looks very decent. It's not exactly the same pattern as the boas on the actual costume, but the effect is close enough to be convincing for me. If anyone wants to do this, it's not hard, but a bit fiddly and time consuming. There may be other options for doing this for better effect, but this is very serviceable and very doable.
First, get some real feathers. I got pack of 100 off eBay for little money being sold for weddings/parties or some other nonsense. They had a lot of different colours but the black ones were what we needed of course. The technique then involves getting some water based sealer or gloss varnis or something similar and pinching the feathers between your fingers to get this kind of scenario:
This is like making mini feathers from big ones. Once dried you then cut along the edges to separate the fronds from the middle stem. Another thing you'll see is it the end points of the feathers make for cleaner shapes, these points need to be cut off and kept separate from the side fronds. Now, I'm not sure how many you need to do, I did probably 60 of the pack of approximately 100 by the end of all this and had a fair few spares, as well as the extra waste from trimming up the 'boas' to the right size once I got them on. Honestly, this is not a lot of work and you can do batches of 20 or so pretty quickly.
Next you'll need a thin piece of fabric, rough 5mm by 6cm, ideally black tshirt material. Then you'll need a round surface, I found a small paint bottles ideal, but probably anything like a 3cm diameter at the base or so. You want to get a curve close to how they'll go on the shoulders. Use two pieces of double sided tape to tape the fabric around the base of whatever round thing your using and then begin applying the fronds (not the points) to the fabric by placing a line of FabriTac or similar along and then pressing them on as on layer. Once they're all on and the glue's grabbed you can roll it around on a hard surface to make sure they stick down good and proper. I'm really not sure how many times you need to repeat this process, but I think about 6 layers worked for me. The fronds will go on flat and adhere very strongly with the FabriTac, just make sure it's dried inbetween each layer to prevent any weak points. Sorry I didn't get any shots at this stage but the one below covers a lot of how this should set up and look.
After 5 or 6 layers of the fronds you then need do a neat layer of the points as a top layer. This is the main one you see so it needs to be the most 'feathery' looking.
Once you glue the top layer in I carefully put a rubber band around it to hold it nice and tight while it fully dried over an hour or so.
The magic of this method is you end up with a lot of feathers without a lot of the bulk that hurts the scale. The layer of the points on top gives a really nice neat line to them. You can then carefully take the feather piece off the tube you used. The FabriTac should give a nice solid feel. After you have done two that are much the same you then need to work out which side works best for each one and then start trimming the excess feathers and also cutting the other side of the piece to get a nice clean line along the inside. You should be able to trim all the way back to the fabric layer, but you'll also need to shape them a bit so they can sit correctly on the shoulder pads. You just want to keep trimming and test fitting until your happy. The feathers themselves can be trimmed a bit more evenly once you put them in place too, always better to err on the side of caution so you don't cut them back too hard, though.
And the end result is pretty decent!!
I only have them on with double side tape at this stage. Once everything else is finalised I'll then hot glue them into position permanently.
If takes a bit of time, but even if you don't want to do the full shoulder pad extension you can still come up with some feather boas that scale pretty well in not much time once you have all the bits you need.
I've still got some painting to do and then making the crossbow more accurate before I'm done, but very happy with the progress so far. If I've missed any steps here or your not sure about anything just ask, only too happy to help anyone who wants to do the same.
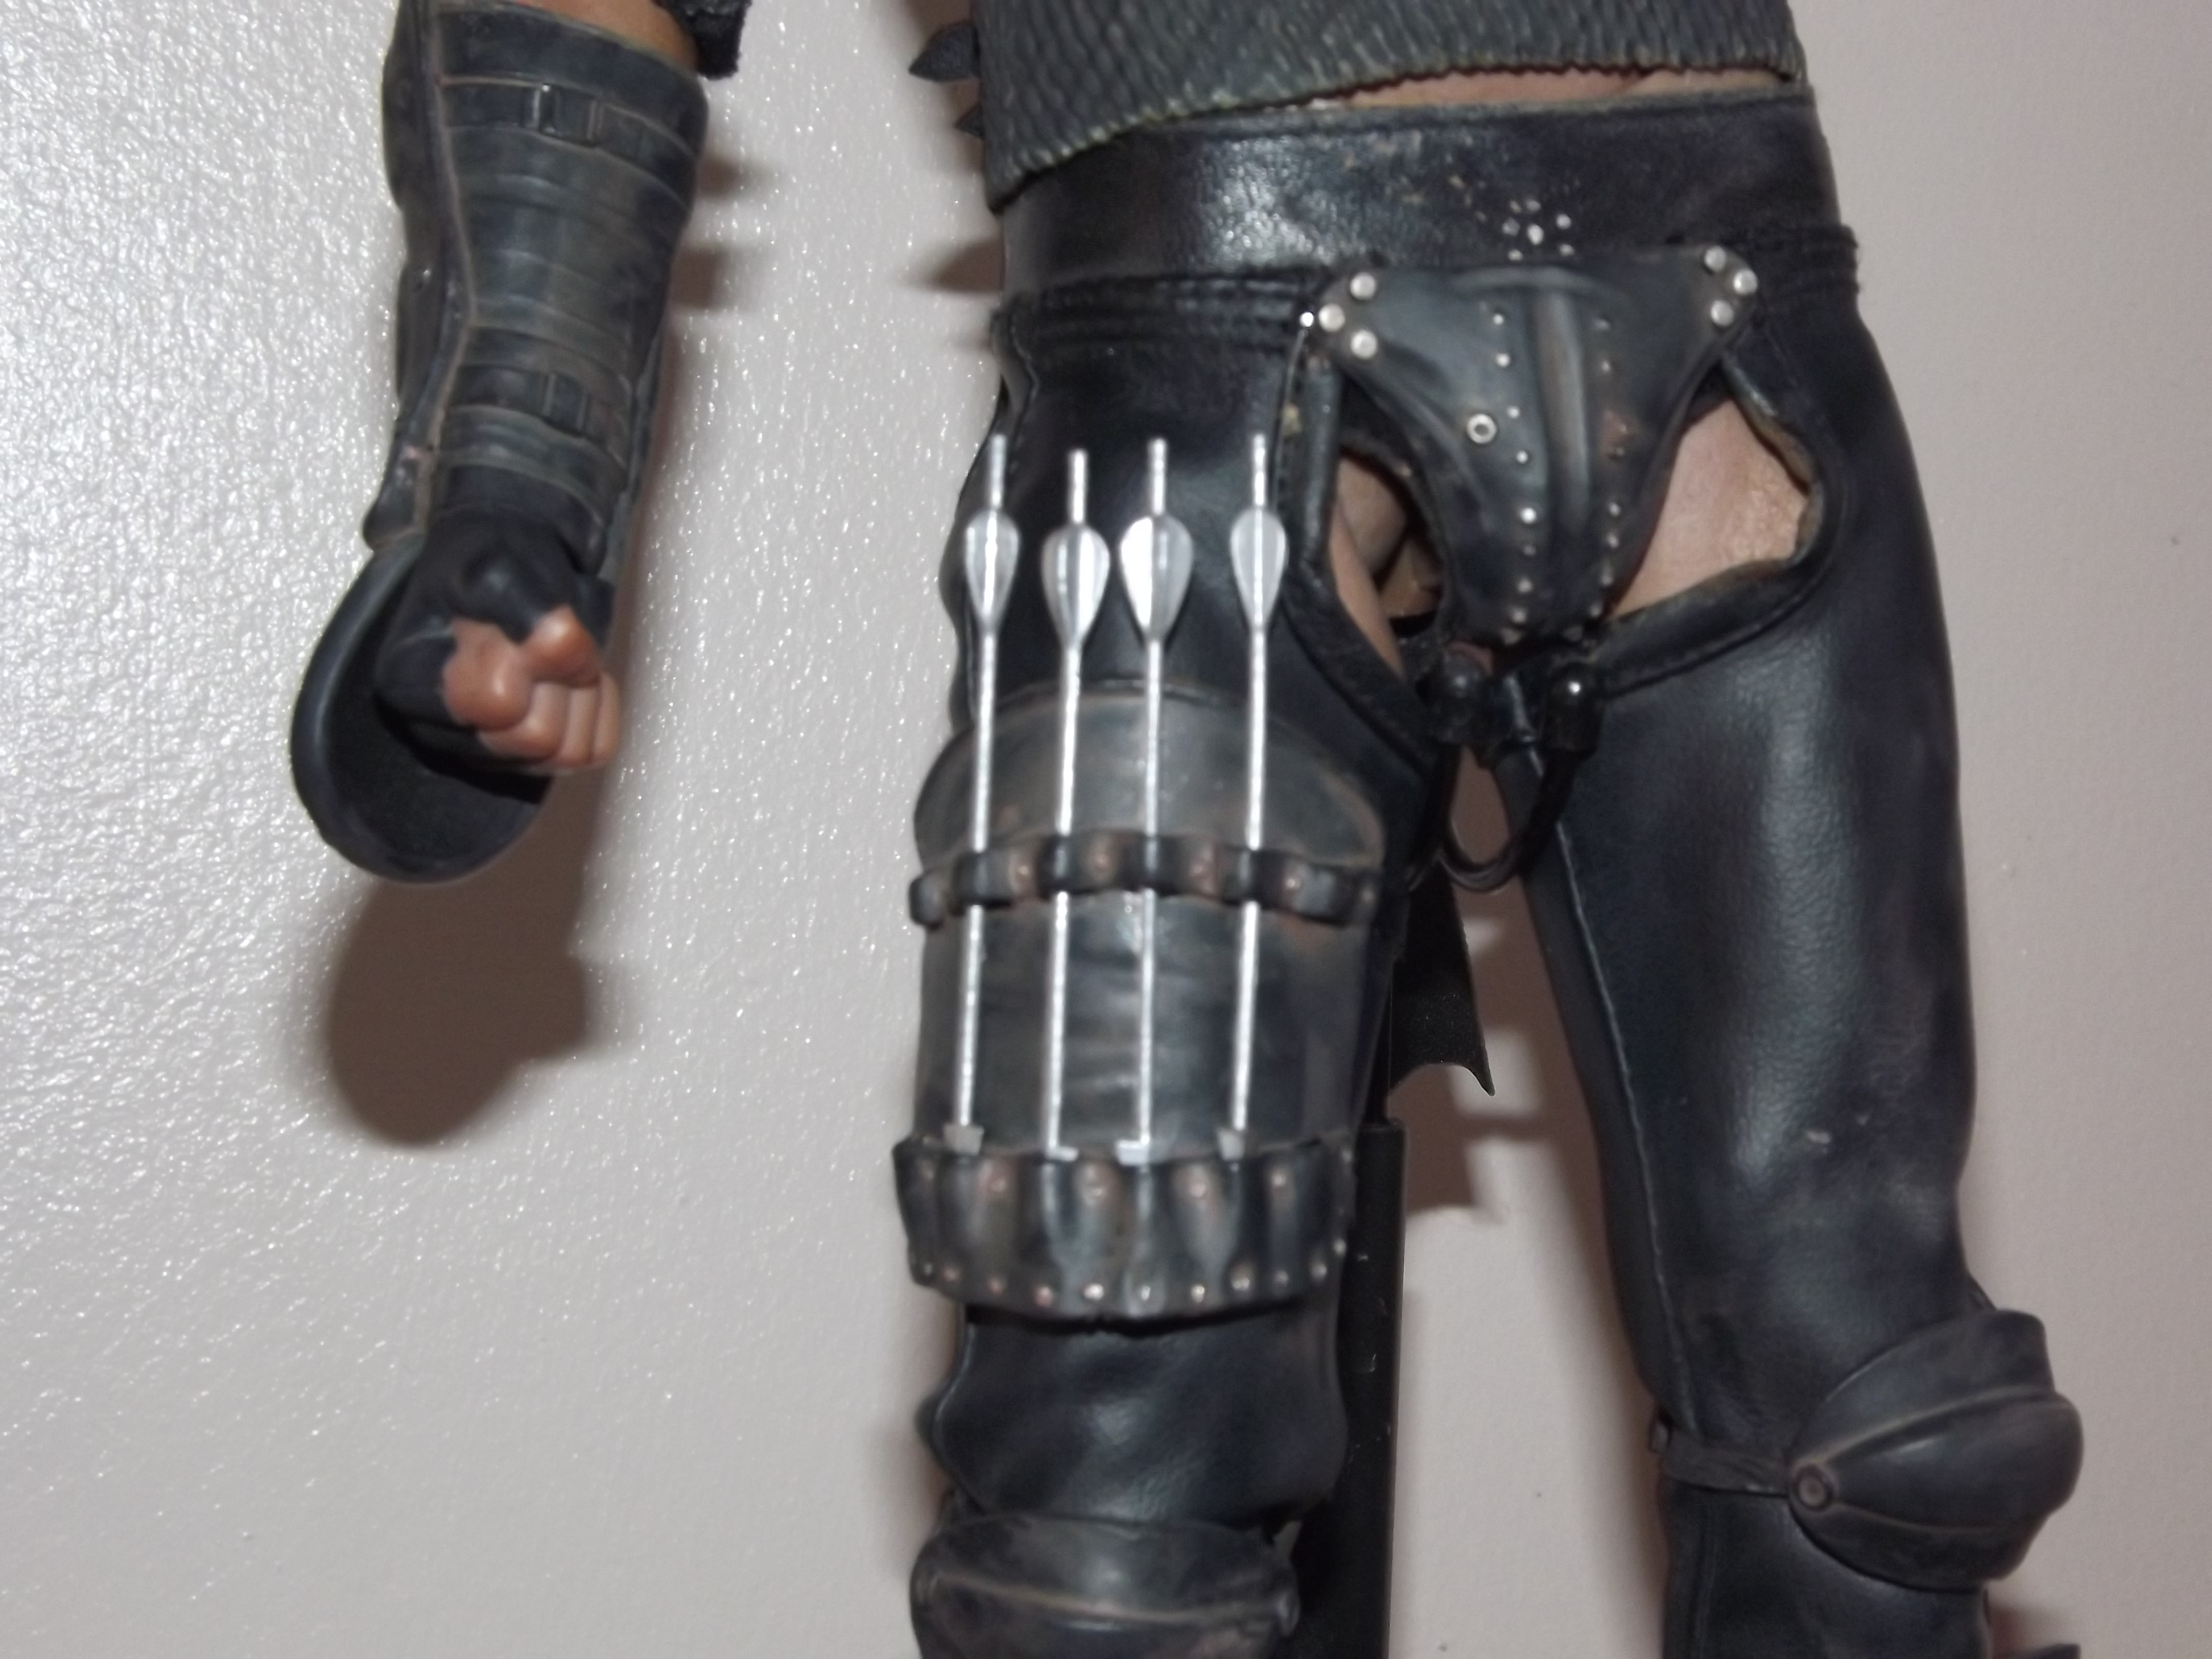
 , not sure I want to go this deep into modding my fig, my real bugbear is the size of the shoulder pad on my fig. I was thinking about getting the shoulder pad off my Wasteland Ranger and modding that, its just that shoulder pad is for the right shoulder not the left, so not sure it will work?


")